Small Form Factor PC Part 2 - Water Cooling
Jan 25 2021
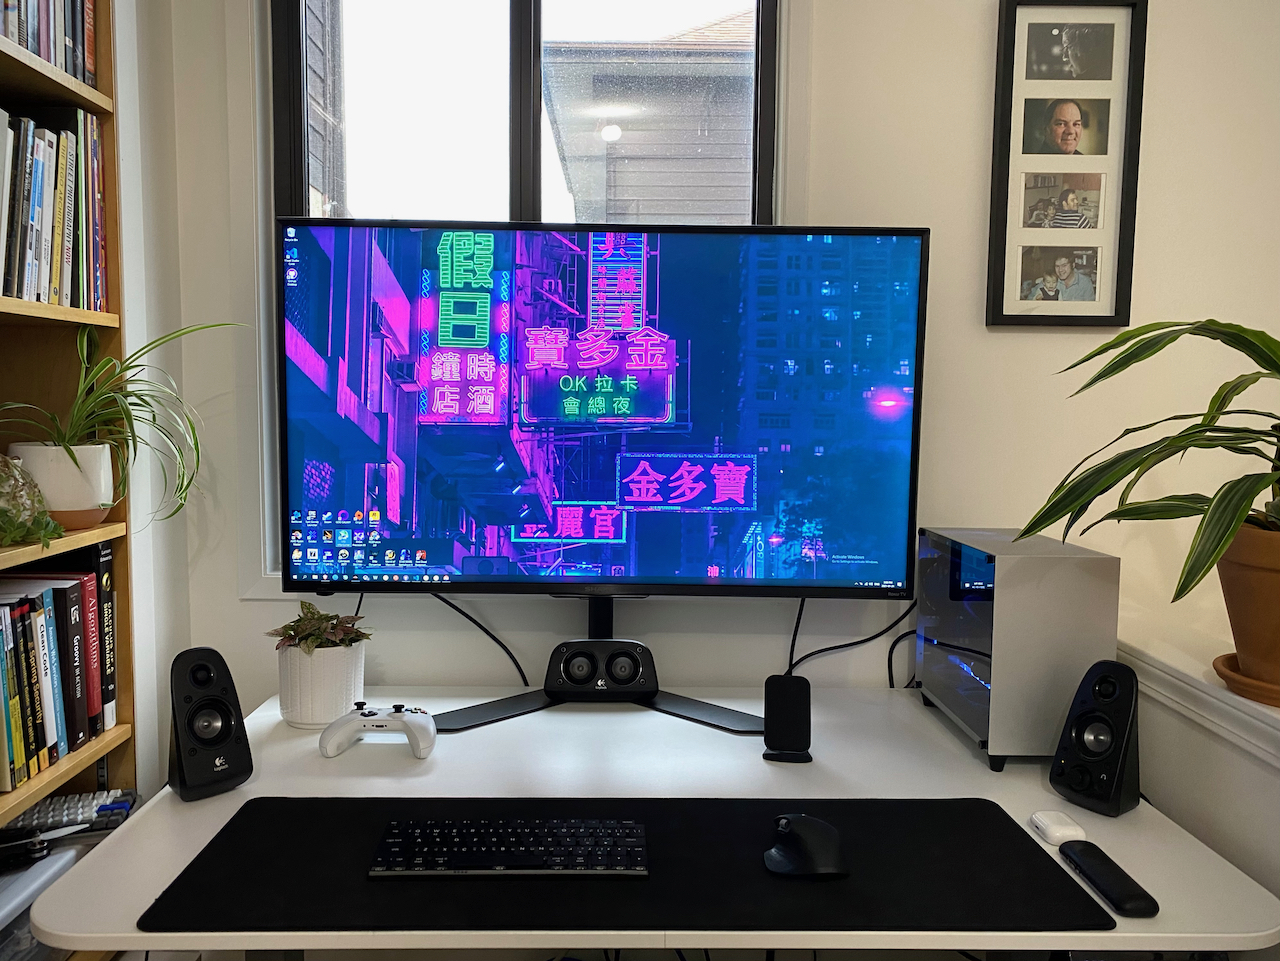
This is a continuation of my small form factor PC build. Part 1 was getting the major components installed and the computer running, and part 2 is adding water cooling for the CPU and GPU. You can add to the discussion if you like on Reddit.
Tl;dr
- Introduction: I put together the major components of this gaming PC in December 2020 so that I could play Cyberpunk 2077 when it was released. In this article I describe my custom water cooling upgrade and some of the gotchas I found along the way.
- PC Components: Ryzen 7 5800X, RTX 3080, ITX motherboard, and a Metalfish S5 case from AliExpress, amongst other things.
- Water Cooling Components: The water cooling system is built using EKWB and Barrow components.
- Installing CPU Water Block: No instructions were included with the Barrow CPU pump/block but the mounting mechanism is quite basic.
- Installing GPU Water Block: GPU cooler installation is a little more complicated but patience and a steady hand can get it done.
- Case & Cable Management: The Metalfish S5 case is only 13.5L in volume and I like it's minimal exterior, but it offers little to no cable management space.
- Plumbing: EKWB black rubber tubing and Barrow fittings connect the CPU, GPU, pump, and radiator together.
- Fans & Airflow: All Noctua slim fans apart from 1 Cooler Master slim RGB fan I had on hand. I use a negative pressure configuration for airflow in this build.
- Coolant & Filling: EKWB Mystic Fog coolant concentrate, although you can't really see it at all. It was tricky to fill the loop without a discreet reservoir.
- Initial Temperatures: The system was running hotter than I had hoped when I first started it up, before any optimizations.
- Fan Tuning & Kryonaut: Kryonaut thermal paste makes a surprising difference, and dialing in the fan curves keeps it cool and quiet.
- Overclocking: I am able to eek a little more power from the GPU for gaming now that my temps are looking better.
- Basic Gaming Performance: I outline some of the graphics settings and performance numbers from some of the games I've been playing recently including Cyberpunk 2077 and Red Dead Redemption 2.
- Crypto Mining, Underclocking & Undervolting: I've been mining with my gaming PC when not actively using it for several years now. Here are some of my mining results and settings I use with this hardware.
- Conclusion: This PC build was challenging and expensive, but I had a lot of fun building it and the performance has been phenomenal.
Introduction
Like many others in 2020, with Cyberpunk 2077 releasing soon and new graphics cards from both Nvidia and AMD announced, I decided to upgrade my gaming PC. I wanted to do something a little different than I had done before, and after discovering the Optimum Tech YouTube channel I fell in love with small form factor (SFF) PCs and the idea of custom water cooling one.
A sorta disclaimer: the combination of SFF and custom water cooling is tricky to build and requires a lot of planning and some iteration. There just isn't the space to buy whatever components look nice and stick them in the case. Each component needs to work together and especially needs to fit in the case. For me, building the PC is almost more fun than having a completed PC. I decided to do this because the act of building the PC appeals to me. Only attempt something like this if you also feel the same.
Also I talk a bit about my experience mining crypto. This is foremost a gaming and productivity machine and I enjoy mining on the side when my system is idle. Please no judgement or hate from gamers hating on miners. There is no harm (to component prices) in mining on the side with your gaming PC.
I outlined in a previous post the initial build and components. This post is my experience upgrading to a full custom water cooling loop for both the CPU and GPU. If you are unaware, "custom" water cooling means that I acquired and assembled all the water cooling components myself and decided on the configuration. That is in contrast to all-in-one (AIO) water coolers available for CPUs and GPUs. These come assembled with a pump, radiator, tubing, and coolant all assembled and sealed, and installation is simple.
PC Components
- • Metalfish S5 case from AliExpress
- • EVGA RTX 3080 XC3 Ultra
- • Ryzen 7 5800X
- • 2x Noctua NF-A9x14 92mm fans
- • Cooler Master slim RGB 92mm fan
- • 2x Noctua NF-A12x15 120mm fans
- • Gigabyte B550i Aorus Pro AX motherboard
- • 16GB (2x8GB) GSkill TridentZ 3200MHz CL14 memory
- • 1TB XPG SX8200 Pro M.2 SSD
- • 250GB Samsung 850 Evo 2.5" SSD
- • Corsair SF750 power supply
- • 2x 3-way 4-pin fan splitters
Water Cooling Components
- • EKWB Quantum Vector XC3 acrylic GPU water block
- • EKWB Quantem Vector XC3 black aluminium GPU backplate
- • Barrow CPU pump/block/reservoir combo acrylic
- • EKWB CoolStream SE 240 radiator
- • Barrow fittings
- • EKWB matte black rubber tubing (15.9mm/9.5mm)
- • EKWB black acetal GPU terminal
- • EKWB CryoFuel Mystic Fog coolant concentrate
Installing CPU Water Block
The Barrow pump/block I used did not come with any instructions, but it was pretty simple to figure out. I ordered the AMD version and it came with the installation plate pre-installed on the block. Included was 4 screws and 8 springs of 2 different lengths. They expect you to use the backplate included with your motherboard so make sure you have that on hand.
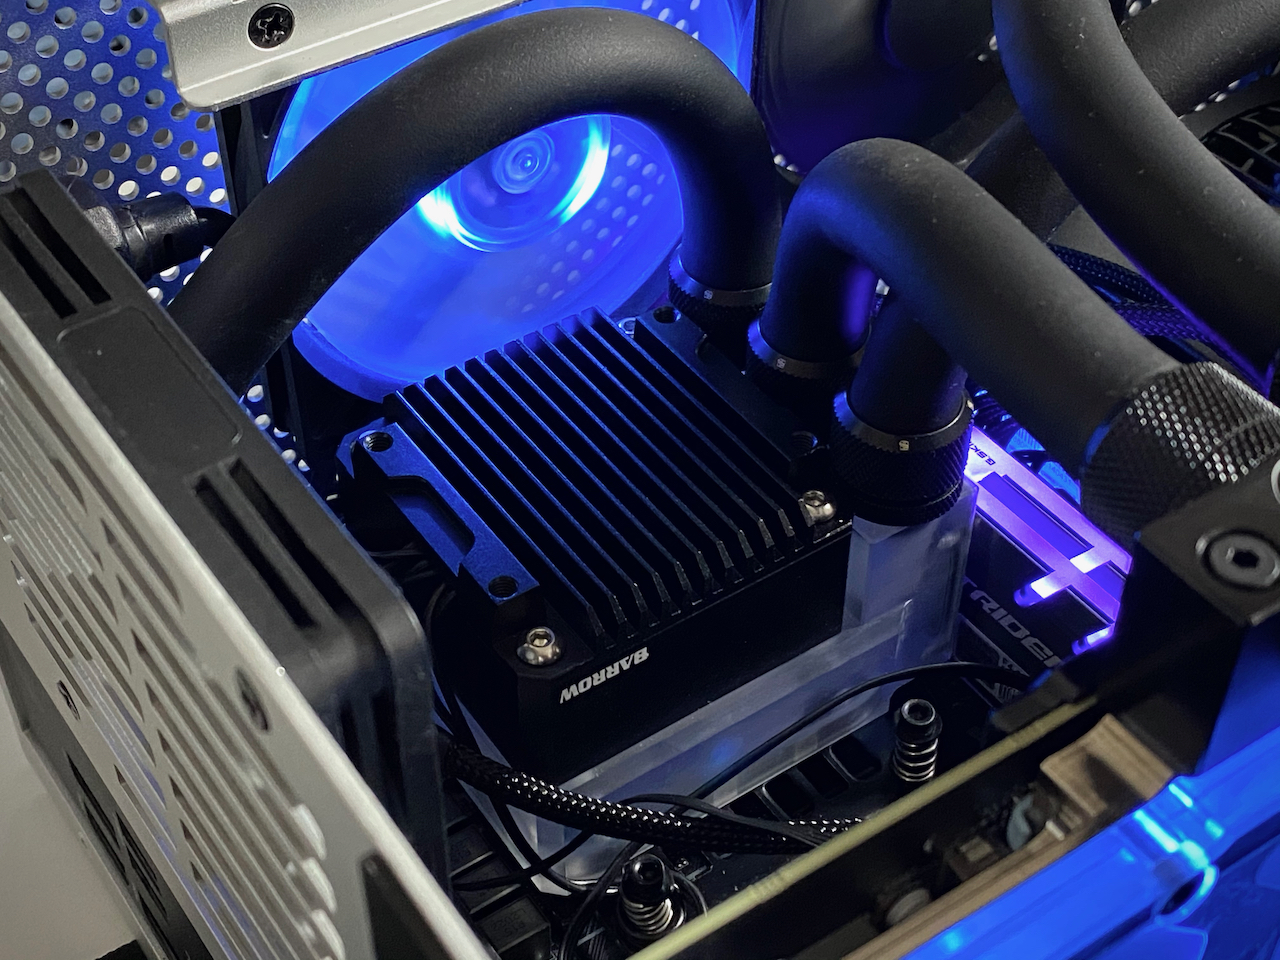
Essentially you put the springs on the screws before screwing the block onto the motherboard. The springs add tension and hold the block in place. I used the longer springs as I wanted to ensure there was plenty of tension. I found that the screws and the springs don't work very well together (the screw tends to splay open the spring) and eventually I found some nylon washers to add in between them which helped. It is difficult to get the tension equal between all 4 screws so I just tried my best and aired on the side of more tension is better.
The block model I got had 4 wired connections (well 5 really) coming from it: 2-pin pump header, molex pump power, a physical potentiometer to manually control pump speed, 3-pin led header, and if you use the included led controller it needs a molex power as well. I don't know if this is the configuration I intended to buy or what other configurations there are, but I don't like these connections.
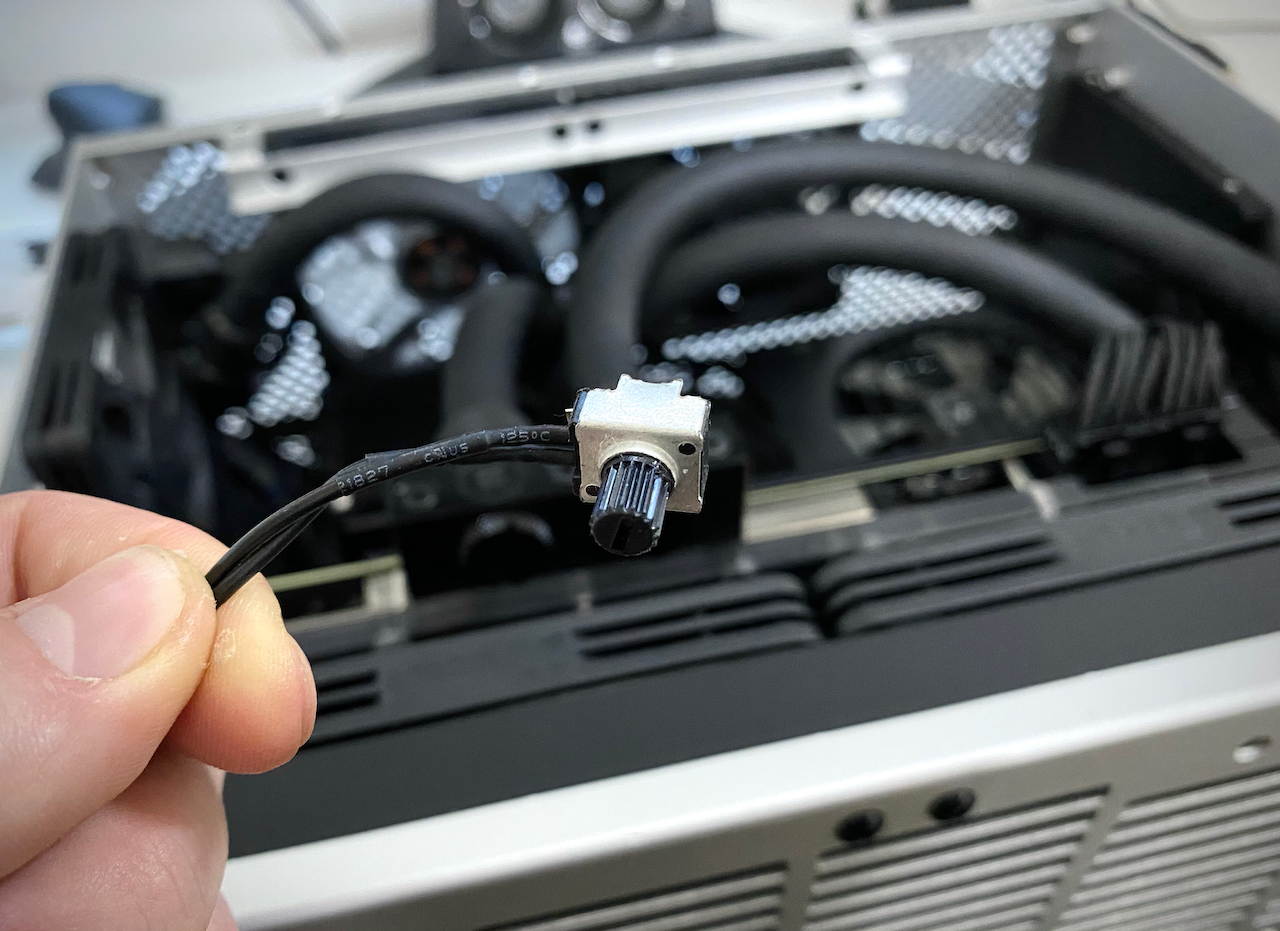
I plugged the pump header into the CPU fan connection on the motherboard, and ran the speed dial out the back of the case so it could be easily accessed. Using the dial to control the pump speed feels very janky. I've done a bit of reading about it and it seems there is a way to use PWM control from the motherboard and potentially remove the dial completely, but I haven't tried that yet.
The LEDs in the acrylic block I haven't got to work at all, I may have broken them. At first I tried to rewire the header to use it on my (temporary) Corsair Commander Pro fan/LED controller. I thought this might work since they both use 5v data/+/ground LEDs, but I couldn't get this to work. I then reverted it back to the way it was and tried to use the included LED controller and that wouldn't work as well. So I don't know, it's just dark for now.

I desperately wish this block just included a standard 4-pin pump header and a standard LED header. It feels crazy to have to use molex connections in a PC in 2021.
Other than those wiring quirks, installation onto the motherboard was pretty simple.
Installing GPU Water Block
Changing a GPU cooler is a little more complicated. I've had experience previously deshrouding my Zotac GTX 1080 so I understood what goes into disassembling a GPU. It requires some tiny screwdrivers, a steady hand, and some patience. The EVGA XC3 was fairly straightforward, a bunch of screws on the back and the backplate comes off. The cooler is disconnected as well (no hidden screws) but you need to gently wiggle it side to side to break the bond that the thermal paste/pads are making. Be slow and gentle as you don't want to damage any components.
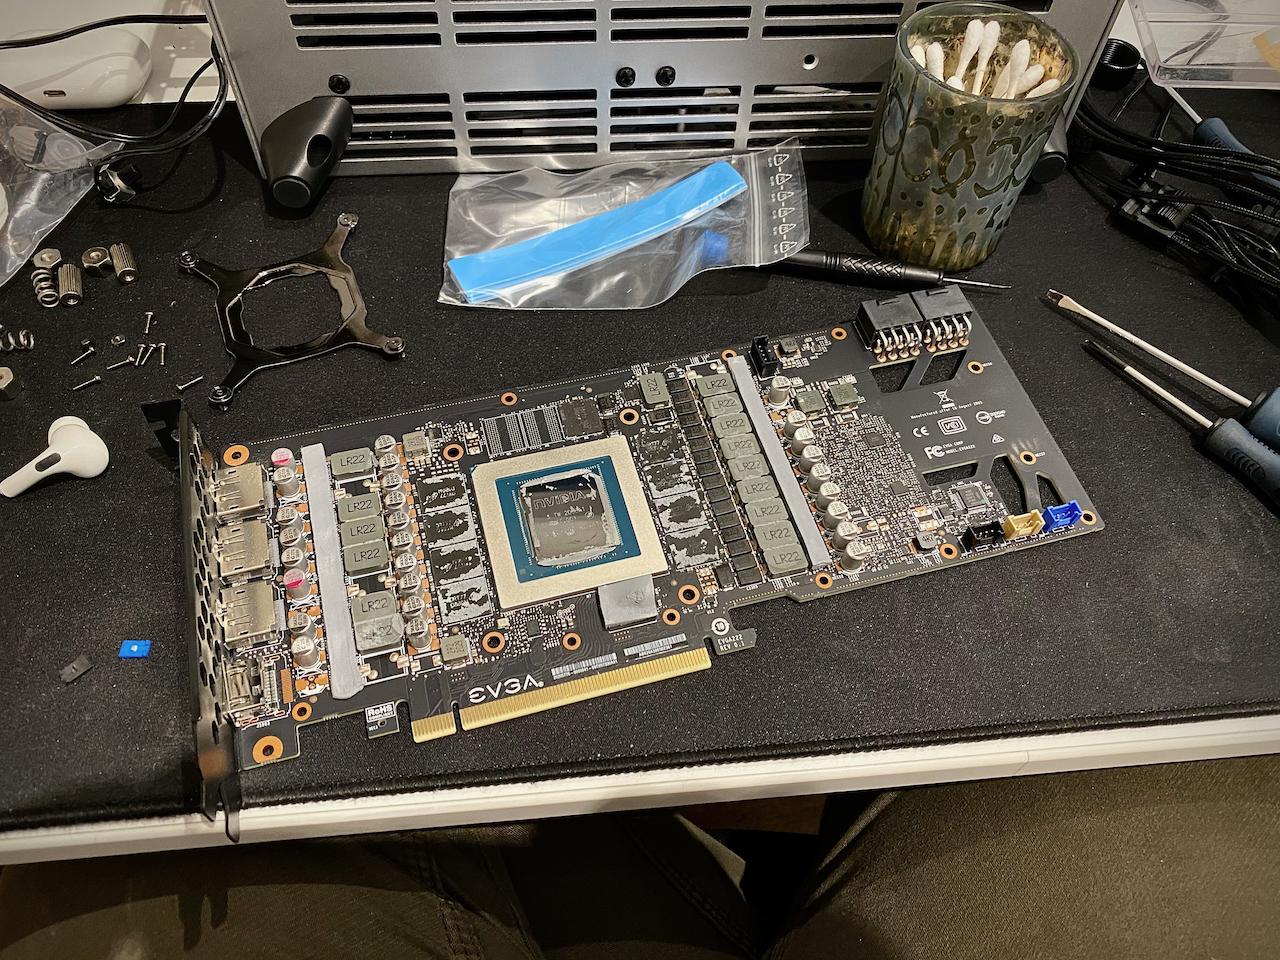
Once the cooler comes off you need to clean the stock paste off. Even the pads EVGA use are almost a paste consistency and you want to clean as much of that off as possible. Use alcohol and be gentle.
Installing the EK block and backplate wasn't too hard. EK gives you a bunch of thermal pads of differing thicknesses that you need to cut to size. Just follow their instructions. One tip I have is that the thermal pads closest to the ports you want to keep it as skinny as possible and as close to the GPU chip as possible. Same as the opposite side, you want to keep it as close to the GPU as possible. These strips sit right on the very edge of the metal block and if they stick out at all they can be visible through the front acrylic of the EK cooler.
EK provides PDF instructions for all their products on the product pages. The instructions don't make it super clear what screws to use if you are using both the EK block and backplate. The block instructions assume you aren't using a backplate at all. I used the screws from the Backplate to attach everything.
One thing I don't like about the EK water block is that the LED header wire is hardwired in. As with everything in this build, there is a dance between all the components as to the order of installation. Having to run this wire when installing the GPU adds to this complication. Not a huge issue though.
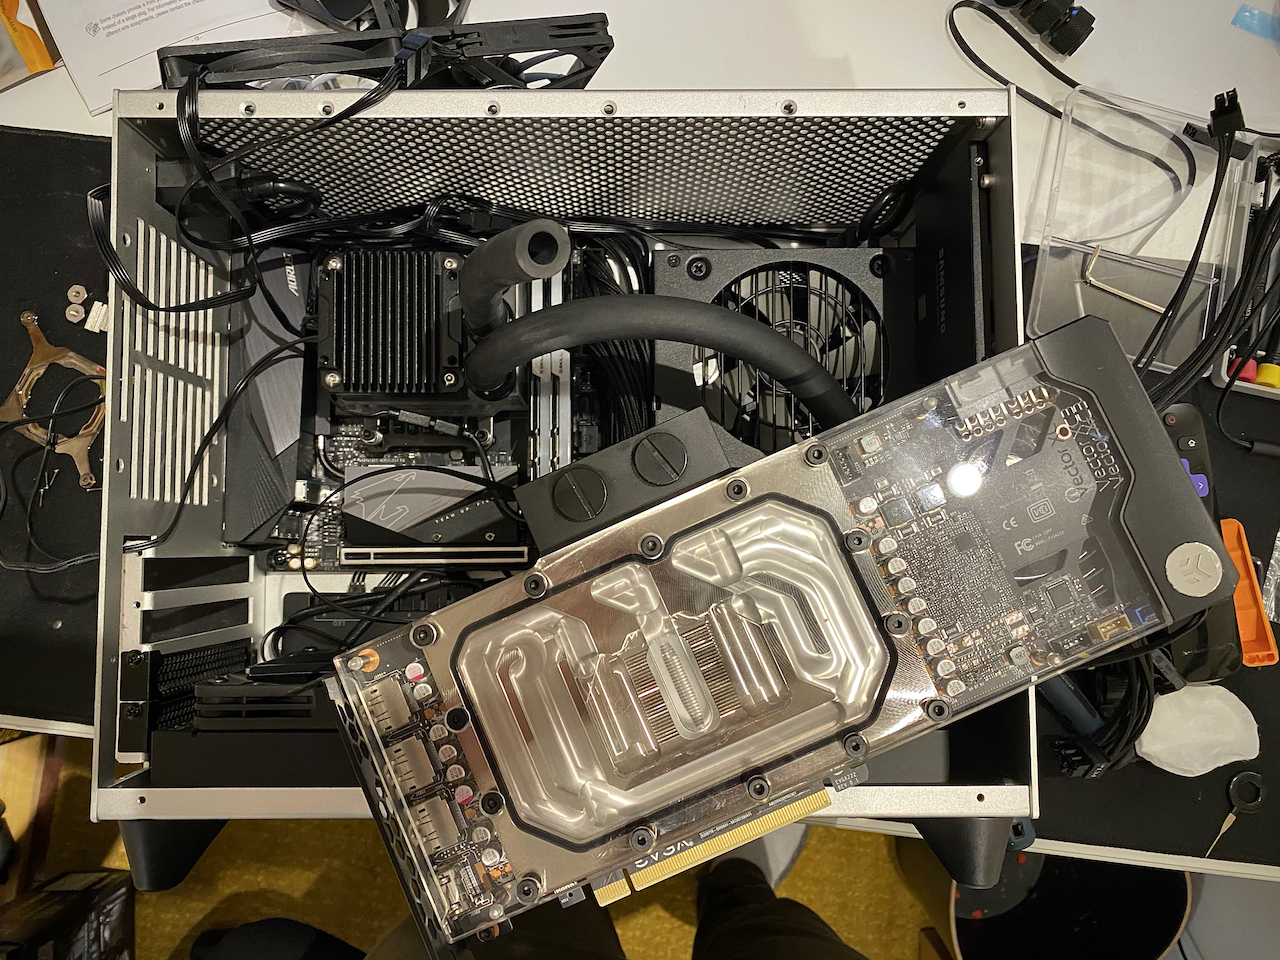
I replaced the clear acrylic terminal with a black acetal one from EK. Mainly this is just because I preferred the matte black part. I also used 2 black Barrow caps on the 2 unused water ports instead of the included polished nickel ones. I actually ordered the EKWB 90 Rotary Terminal as well as my first choice, but that is a few mm taller and would not fit in my case.
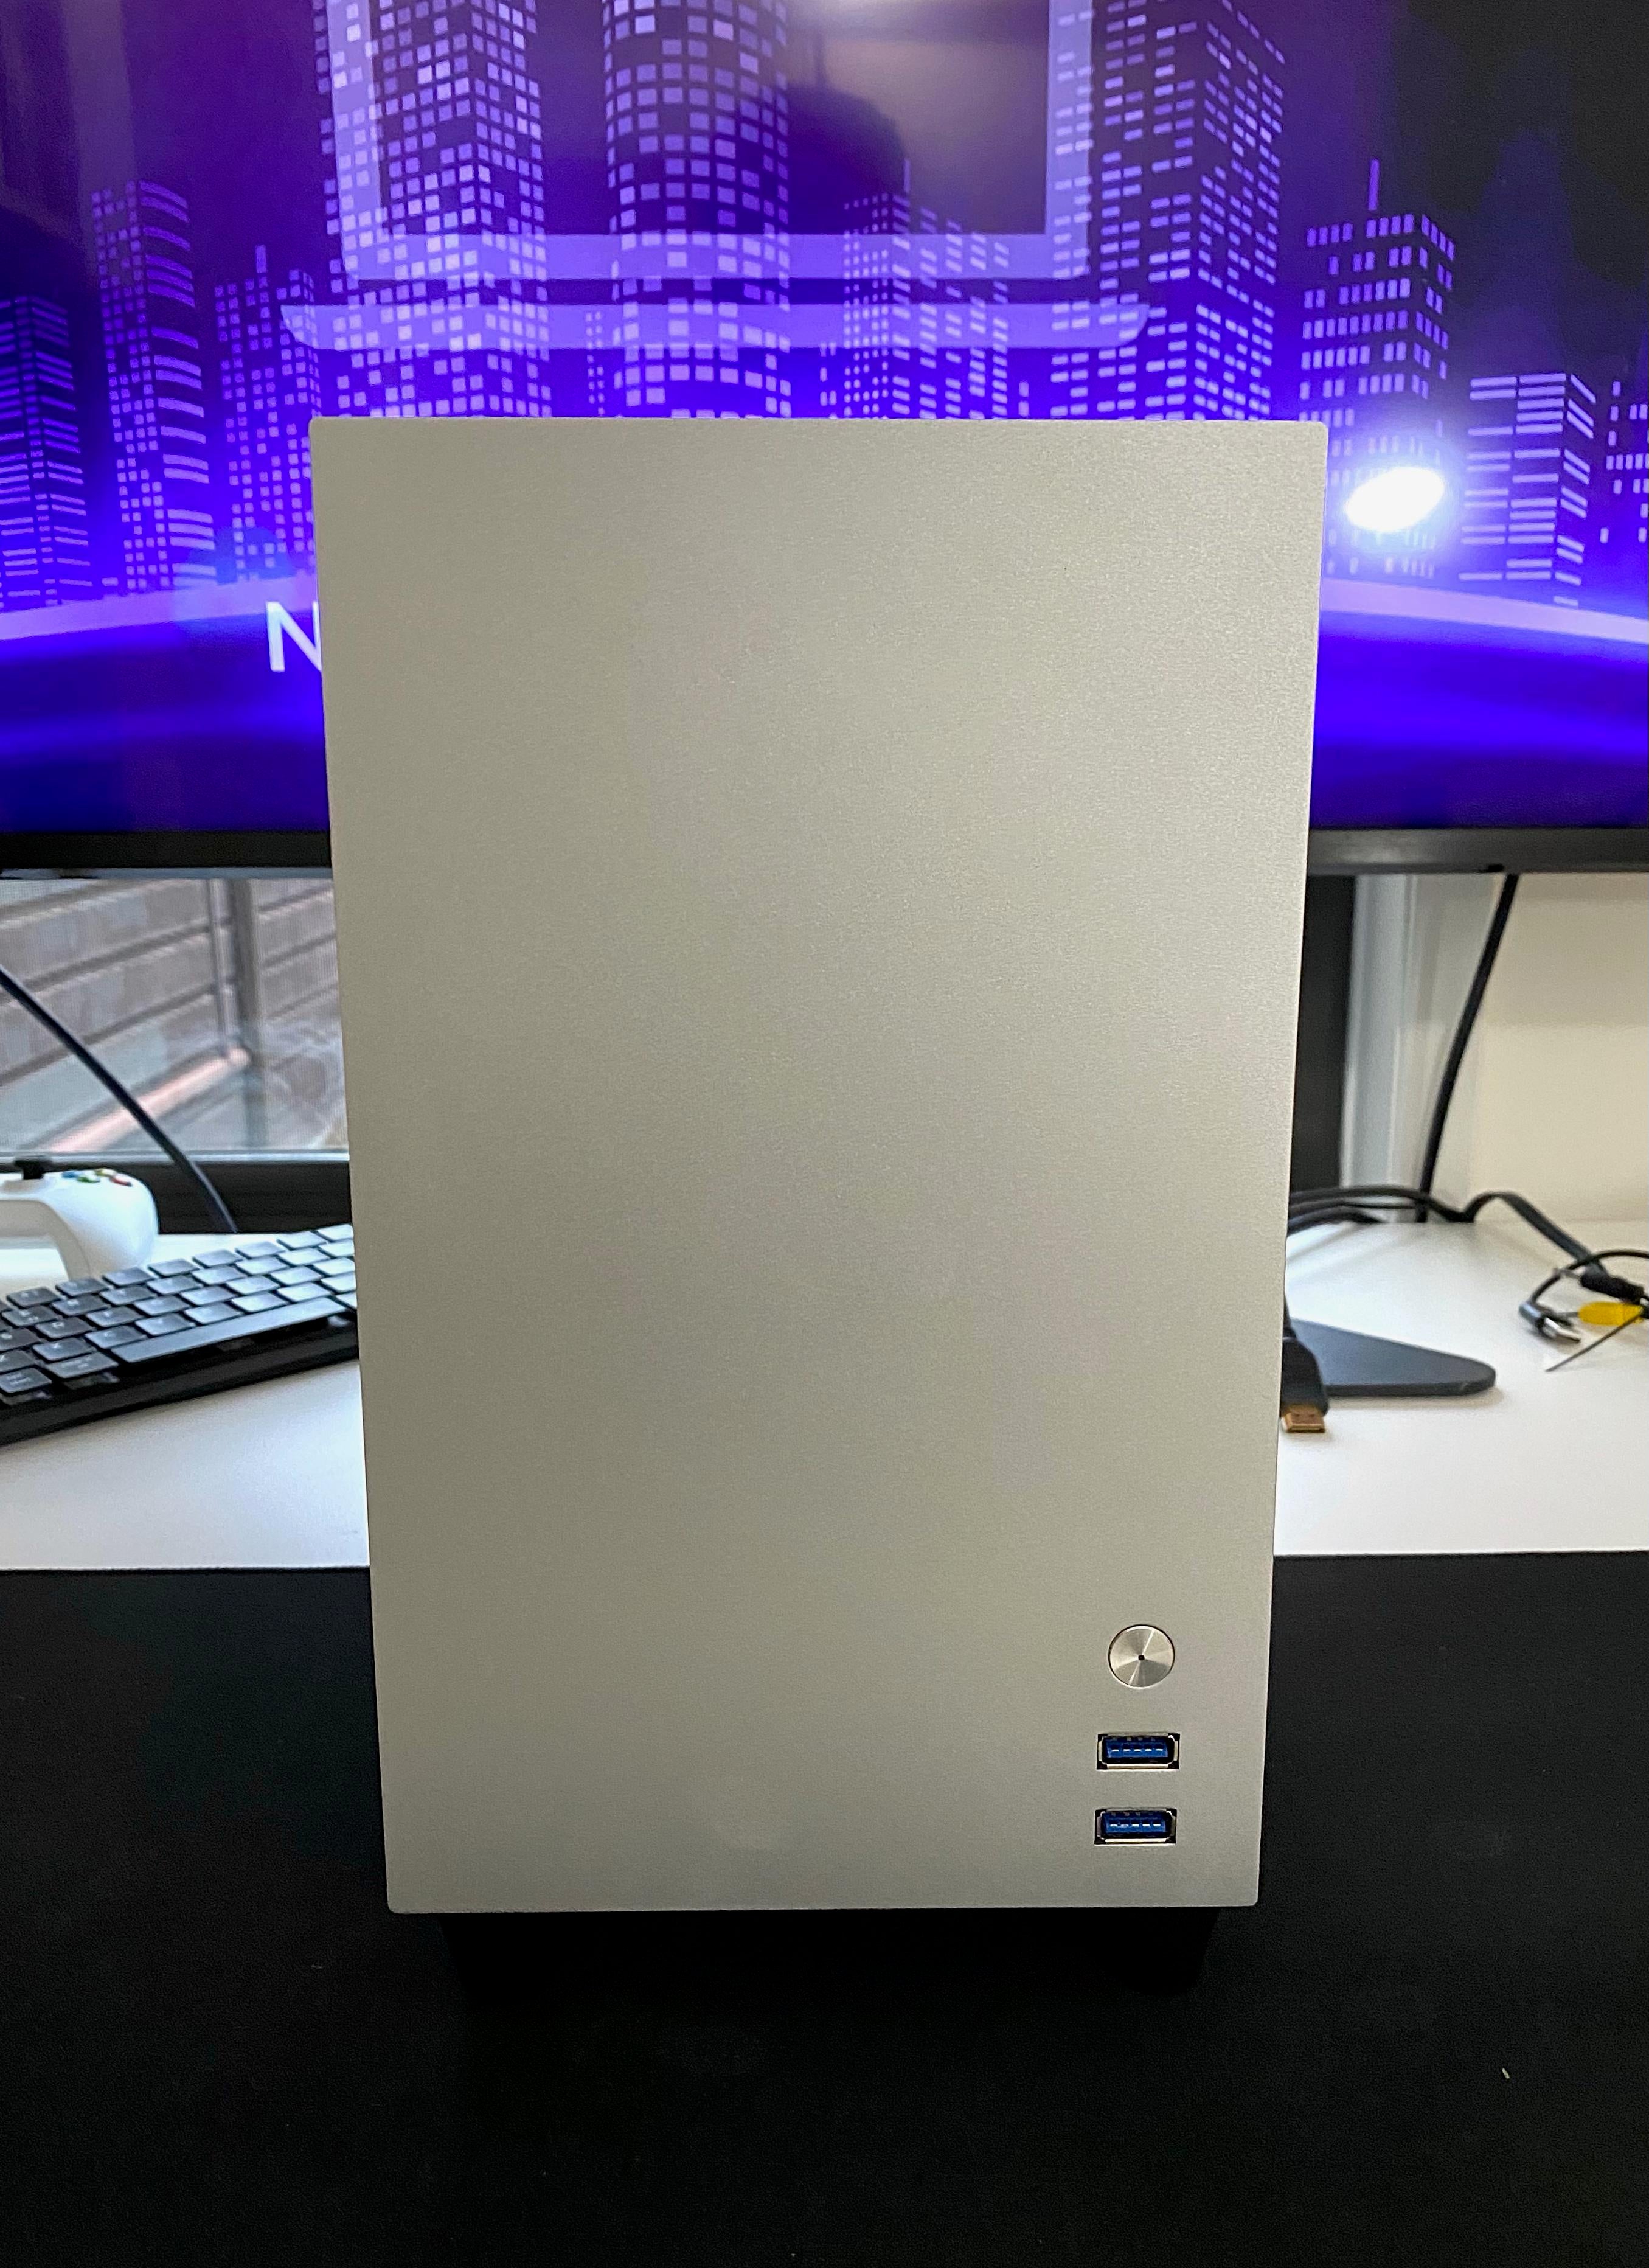
Case & Cable Management
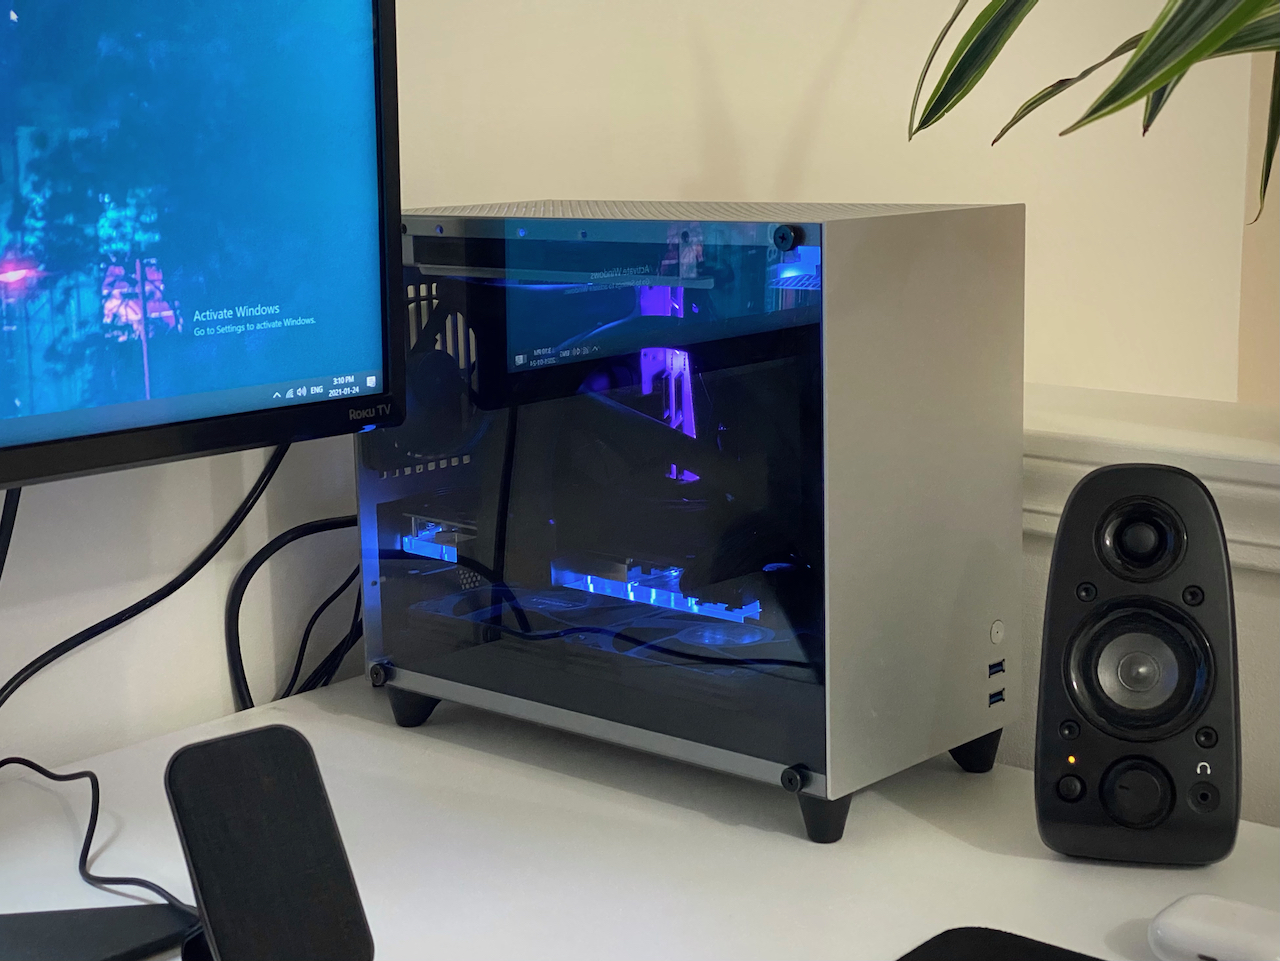
The case I chose was the Metalfish S5 bought from AliExpress. It's a 13.5L case with MATX motherboard support, support for 3+ slot graphics cards up to 310mm long, 240mm radiator support, and optional support for 2 2.5" SSDs. It offers 4 PCIe slots on the rear meaning you can take full advantage of a MATX board if you like. I instead opted for an ITX motherboard and a radiator on the bottom. The case can support 2x 120mm fans on the bottom, 1x 92mm fan on the rear, and 2x 92mm fans on the top using the optional bracket. The motherboard is snug up against the top of the case so there is no way to fit 120mm fans at the top unfortunately. It's made of aluminium and comes with a nice, slightly tinted, tempered glass side panel attached with thumb screws.
Like a lot of SFF cases it has the power supply mounted internally with a cable connecting it to the back of the case. It's kinda designed for the PSU to draw air from inside the case and vent it out the top.
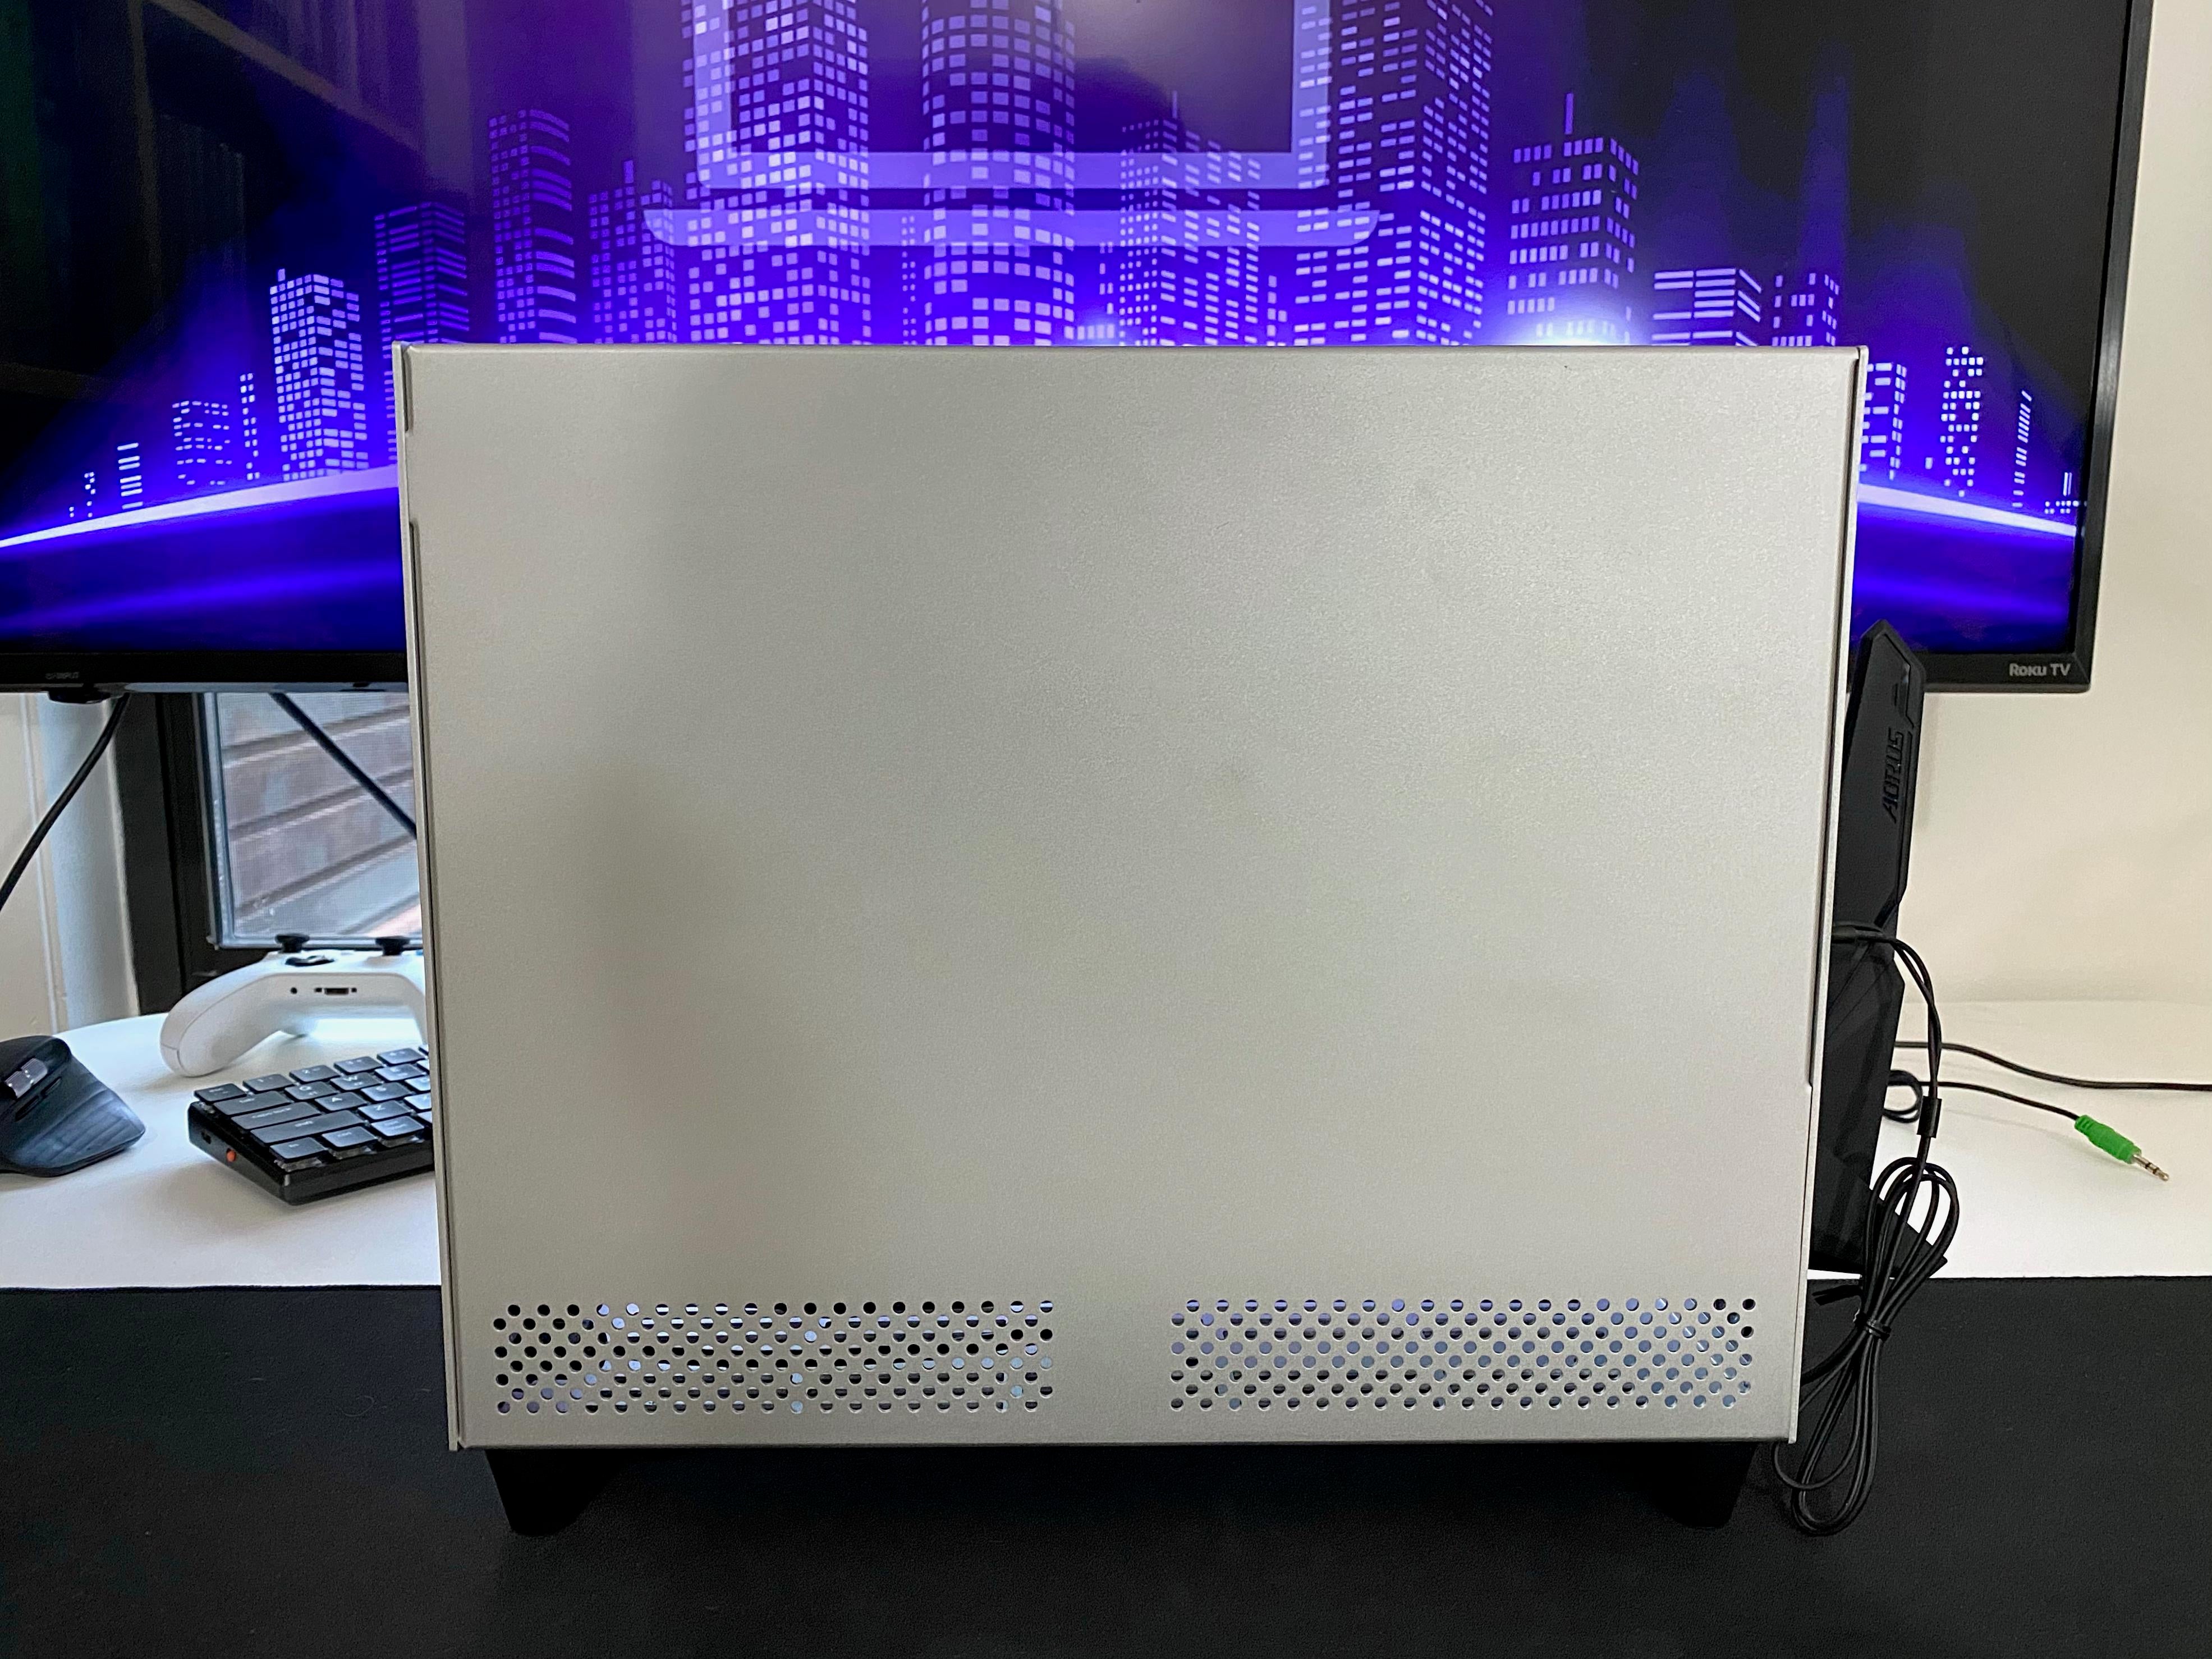
Cable management was by far the hardest part of this build. The Metalfish S5 is very basic (which is part of what drew me to it). It is just an aluminium box with no frills. The motherboard standoffs are attached directly to the back panel. Every other case I have worked with had a removable back panel with a gap between the motherboard tray and the side for cable management. This case does not have that luxury, instead opting for minimal size.
There is a bit of space between the motherboard and the back panel (that the standoffs create) that I routed some small cables through prior to installing the motherboard. The front panel USB, power button cable, and SATA cable I ran along the bottom of the case, up under the motherboard from the bottom, and out through the right side so they can neatly plug in on that side. This helped a bit with the cables but is a bit finicky to do.
The front power LED is a very bright blue and I actually have left it disconnected as I didn't really like the look of it. There are enough LEDs inside the case to indicate it is on.
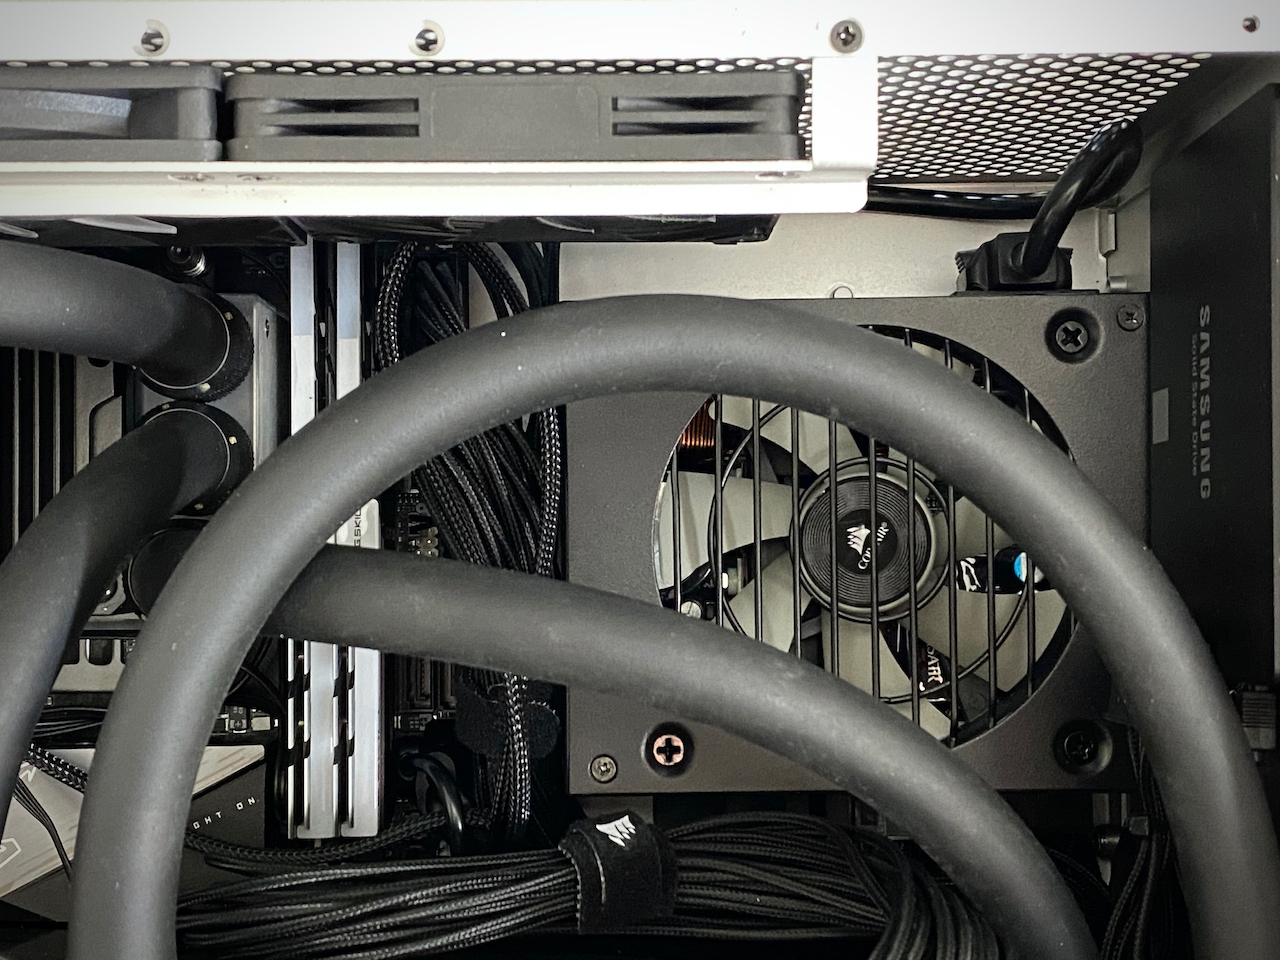
The case comes with a small bracket to hang the power supply on the front and back side of the case. This is how I had it installed in part 1 of the build. I instead wanted to install it flat on the back panel beside the motherboard to leave more room for the water tubing in front. I used 4 pieces of strong double sided tape to adhere it in place and that seems to work extremely well. I used less than 3 square cm of tape (in 4 pieces) as I wanted to be able to remove it without damaging the aluminium. The back of the PSU is facing up to exhaust heat, the fan is facing forward, and the connections are pointing down.
I was actually very satisfied with the Corsair SF750's included power cables. They have black sleeves and are quite short as they are designed for SFF cases. The CPU and motherboard power cables are almost the perfect length, they route nicely between the motherboard and PSU and connect easily.
The 2 PCIe power cables included with the SF750 have splitters built into them. I didn't want to use 1 power cable for both power ports on my GPU (I noticed the power cable getting a little hot to the touch when trying this) and with using 2 power cables I didn't want the splitters just hanging in there unused. I decided to remove the splitters from the cables. I bought some power cable tools on Amazon to non destructively remove the cables from the connectors. I ended up just using the pointiest one so really a good sewing needle or point tweezers would likely work. After pulling each cable out I cut off the splitter as close as I could to the connection and then pushed the cable back into the connector. This worked really well and it looks much cleaner now.
The GPU power cables are still a bit long for the current configuration and I may try to shorten them in the future to make it a little cleaner.
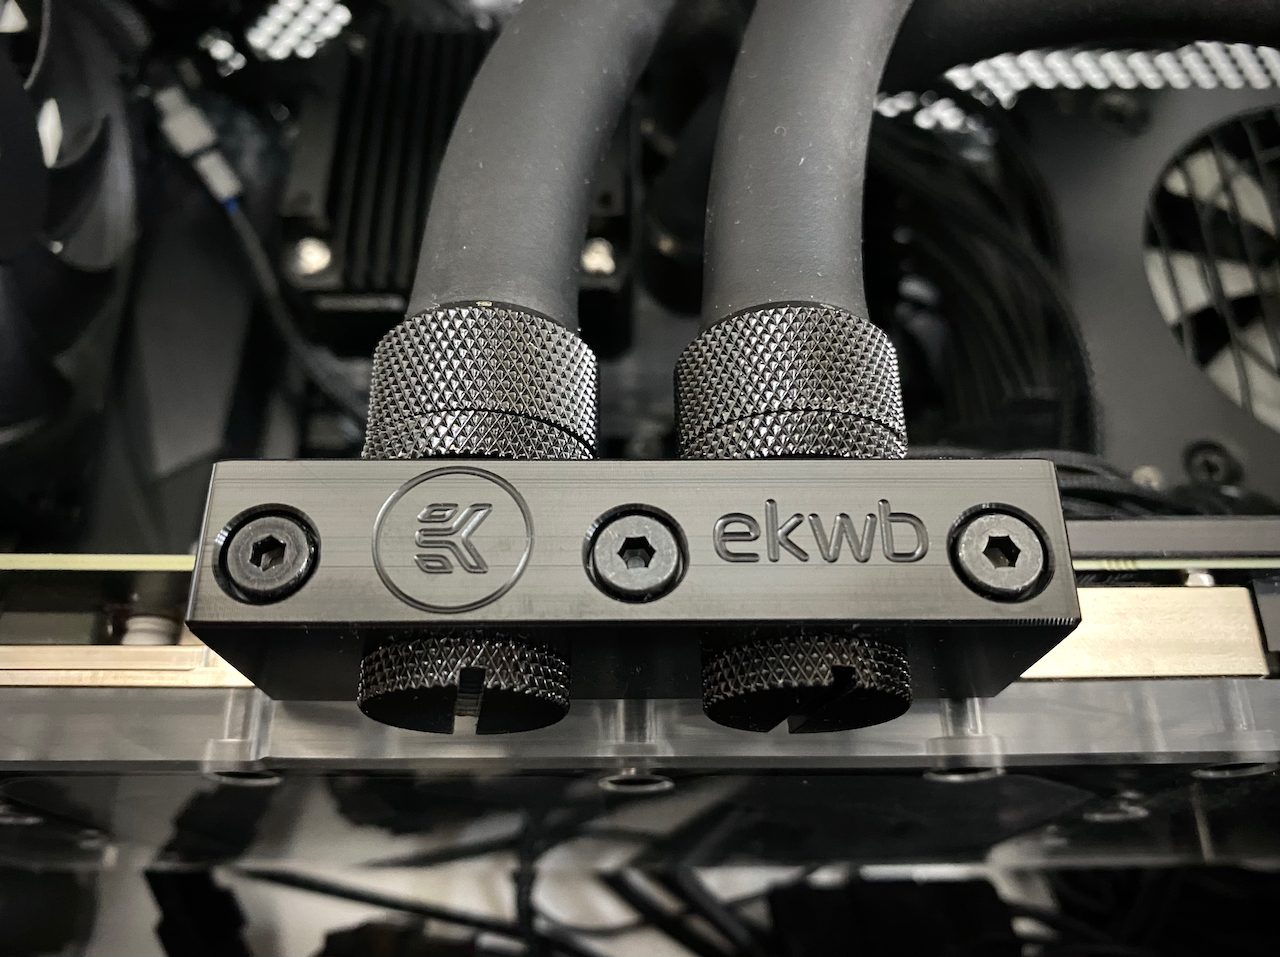
Plumbing
I tried to order all the fittings I would need from AliExpress when I ordered the Barrow pump/block. It was tricky to anticipate all the fittings I would need before trying to build it. I did an ok job but I would recommend getting more 90° adaptors than you think you need, they are very helpful and I wish I got more.
I used Barrow 3/8"(10mm) inner 5/8"(16mm) outer and EKWB 3/8"(9.5mm) inner 5/8"(15.9mm) outer parts. Barrow and EK use slightly different metric measurements but they work perfectly together.
In total I ended up using:
- • 8x Barrow standard compression fittings
- • 4x Barrow 90° rotary fittings
- • 1x Barrow 4-way adaptor
- • 5x Barrow plug
- • ~60cm (2') EKWB ZMT matte black tubing
The Barrow compression fittings can be a little hard to screw together once the tubing is on. I used a tiny dab of mineral oil to lubricate the rubber so I could more easily screw down the fitting. I have no idea if this is ok or ill advised but it seemed to work great for me and I've had no issues. Just go light on the oil. You can also just use water if you like.
I decided to go radiator → GPU → CPU (includes pump) → back to the radiator as the loop flow direction. I thought at first that the GPU would be the hottest thing requiring the most cooling. I'm not sure if this is the case, I may actually try swapping the order of the GPU and CPU in the loop at some point to see how temperatures are affected. The Ryzen 7 5800X puts out a lot of heat!
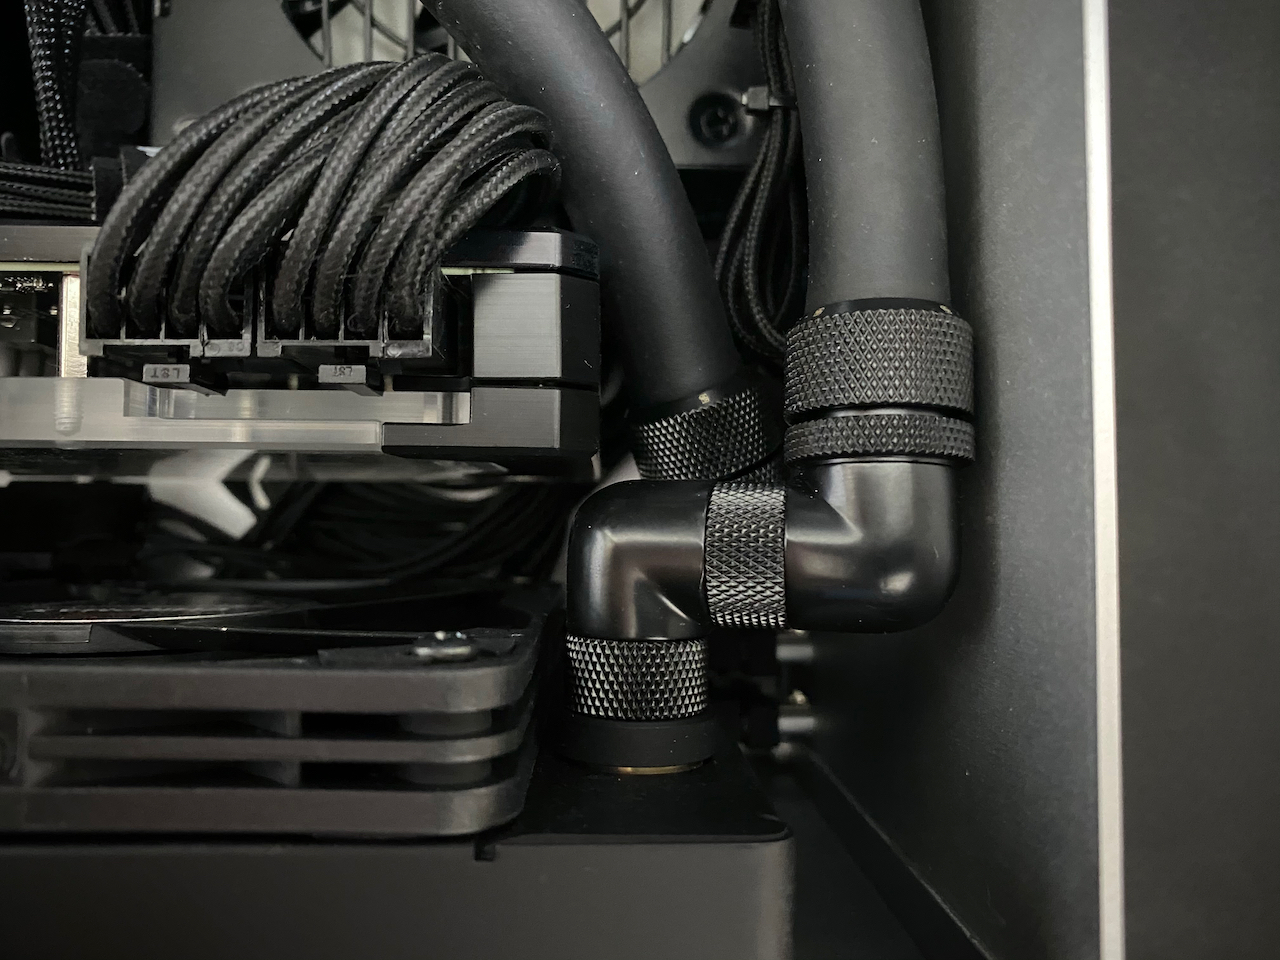
I needed to use all 4 of my 90° fittings to get the radiator inlet/outlet to avoid the GPU. This is one of the longer GPU blocks available (since the EVGA XC3 3080 has quite a long PCB after removing the stock cooler). I would have liked to use at least 1 90° fitting on the GPU as well (between the radiator and GPU) but I didn't have this on hand so I just used the straight compression fittings everywhere else.
I left a fair amount of slack in the tubing run between the radiator and GPU. This was partially to avoid any strain on the connections, but also having more tubing means more water volume. More water volume means greater absorption of spikes in heat and a longer time before the system becomes heat-soaked. This build does not include a reservoir (apart from the very tiny space in the Barrow pump/block) so having longer tubing and greater coolant volume felt like a good idea.
Fans & Airflow
I have 2x 120mm intake fans on the radiator on the bottom, and 3x 92mm exhaust fans on the back and top of the case. I am very satisfied with Noctua's chromax black slim fans. Decently quiet and good airflow.
Controversially I am not concerned about dust so I actually run with negative pressure and no dust filters. I don't mind cleaning my computer now and then. I've found that negative pressure is much more performant at cooling than positive pressure.
Negative pressure just means that the fans are blowing more air out of the case as they are pulling in, creating negative air pressure inside and causing air to enter the case wherever possible. Positive pressure is the opposite, causing air to exit the case wherever possible. Getting the hot air away from the components as quickly as possible is the goal and negative pressure helps with that.
If you want to have a glass side panel you may want to consider a negative pressure configuration. My current system actually runs cooler with the glass panel on compared to taking it off and having an open side. This is because as the case is more sealed, more air is drawn in through the radiator because of the negative pressure configuration, cooling the liquid more effectively.
I originally had the Corsair Commander Pro fan/LED controller installed and controlling the fan curves. I got this because it has temperature probe inputs and I want to eventually add a liquid temperature sensor to base the fan curves off of. This controller and its iCue software just did not work for me. I had so many issues getting the controller to work with my motherboard and I could not get the included temperature probes to even work at all. I ended up returning it.
The Gigabyte B550i Aorus Pro AX has 3 fan headers. 1 is used for the Barrow pump. I am using fan splitters to run the 2 120mm radiator fans to 1 header, and the 3 92mm case fans to the last header.
Coolant & Filling
I used EKWB Mystic Fog cooling concentrate and distilled water. You can't really see the coolant just by looking through the side panel. I chose Mystic Fog as I wanted to be able to have only neutral colours in the system and control all the colours with the LEDs. Mystic Fog is essentially milky white in colour and has something in it to help diffuse light. This setup holds around 350-400mL of coolant.
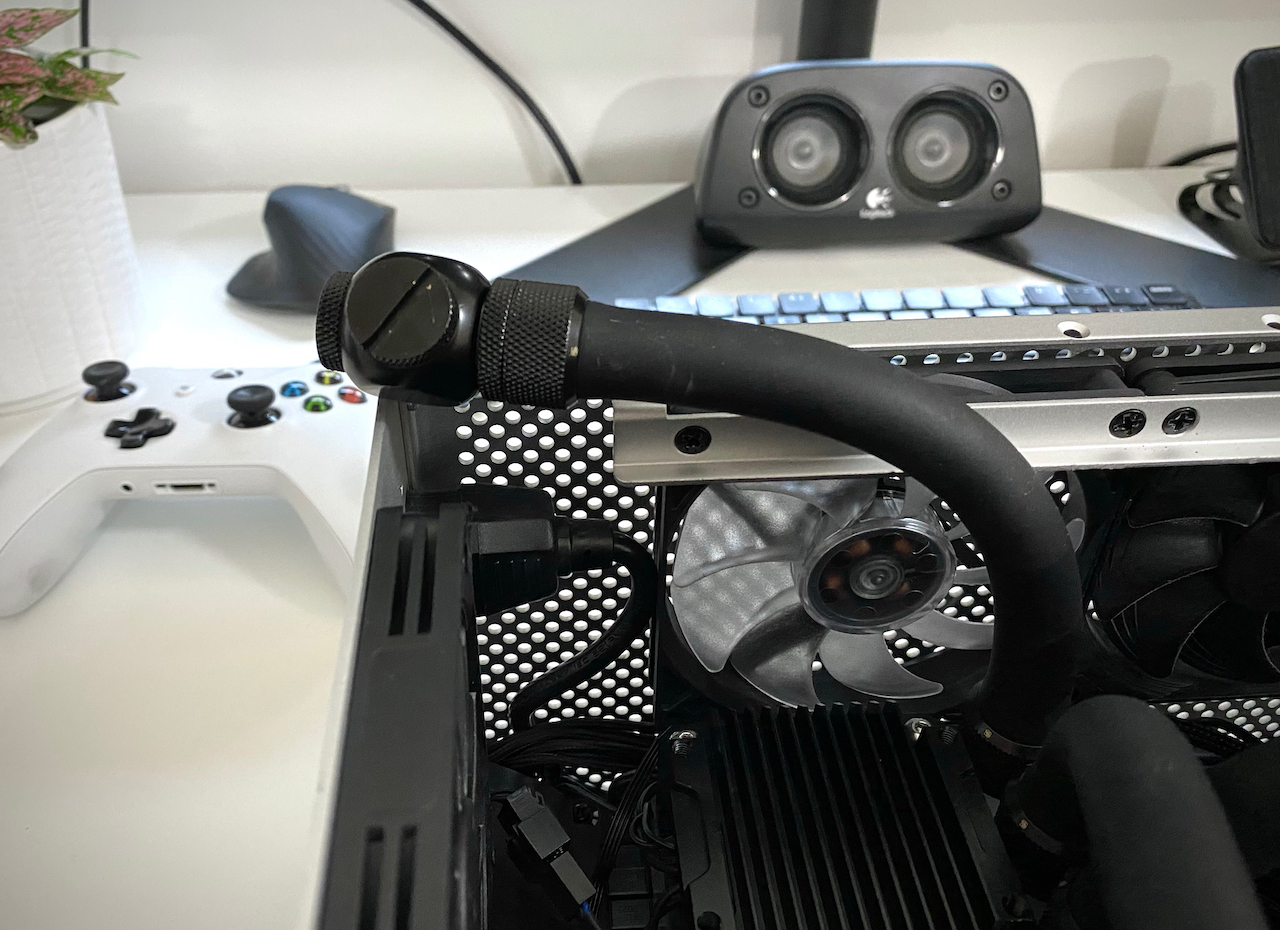
Filling this system was a bit tricky. I wanted to fill directly into the fill port on the CPU block, but because there is no easy access from the top this was impossible. I also need to be able to move the case around a bit while filling to get the air out. What I ended up doing was attaching a small piece of tubing (~15cm/6") to the fill port and the 4 way splitter to the other end. This gave me a more convenient way to fill with a small funnel and still allow me to wiggle the case around to get the air out. When the system was full I capped off the splitter with plugs and tucked it towards the back. You can see it in the pictures at the top rear of the case. When not being used to fill or drain the system it sits in there as the highest point in the loop holding any air bubbles that percolate up.
Draining the system is a little harder than filling it. This has been my only experience with custom water cooling so far but it is even more stressful draining the system than filling it. It's very difficult to get all the water out of each component. Just be very careful and do it methodically.
Initial Temperatures
I didn't actually know what to expect with this setup: Ryzen 7 5800X, RTX 3080, and a single 240mm slim radiator. I kinda understood that this might not be enough cooling and at first this looked to be the case.
I was using crypto mining with NiceHash as my temperature benchmark. With stock overclocking settings (no overclock or underclock) I was seeing quite high temperatures. Just CPU mining (no GPU) I was seeing CPU temperatures above 85°c. CPU and GPU mining together and the CPU was hitting 90°c and affecting the boost frequency. While mining on both, the GPU was hitting around 80°c. The GPU temperature felt ok but the CPU was running way too hot. I decided not to CPU mine for now until I could figure out how to get that temperature down.
When gaming (Cyberpunk 2077 was my main gaming benchmark) temps looked okay. CPU was running around 80-85°c and GPU was running around 65-70°c. This is at 4k Ultra settings, no ray-tracing, and DLSS Quality, running around 55-60fps. These are ok temperatures but I was hoping for some more headroom for overclocking.
Fan Tuning & Kryonaut
Dialing the fans in helped with temps a bit. I like having a silent mode when the system is idle and this works really well. I can easily stop all the fans and just run the pump at idle or when doing basic tasks for virtually silent running. Using the CPU temp as the controller I ramp up fan speed around 50-60°c and have them hit 100% speed at 80°c. Could use a bit more tuning but it has been working well, and the high fan speed under heavy load doesn't bother me too much. Since I mine crypto currency when not gaming the system is rarely at idle so the silent mode really never gets used!
Since I saw the CPU temperature still acting quite spikey, I thought that the issue I was having wasn't that the water was getting too hot, just that the CPU wasn't transferring it's heat to the water fast enough. I decided to try some Thermal Grizzly Kryonaut paste as several YouTubers claim this has the best performance before using something like liquid metal. I was using Noctua NT-H1 paste before on both the CPU and GPU
I disassembled the entire system and used Kryonaut paste on both the CPU and GPU. I used their recommended application procedure. Normally I put a small dab in the middle of the chip and let the cooler squish it out over the chip. Thermal Grizzly recommends using their applicator or a small piece of flat plastic to evenly and thinly spread the paste over the whole surface of the chip. This seemed to work well and I don't understand why everyone recommends just using a dab and leaving it up to chance, hoping that it will get evenly spread over the chip. Just spread it yourself!
Many hours or reassembly later and I was astonished at the difference it really made. Both the CPU and GPU were running more than 5°c cooler than before.
I highly recommend Kryonaut thermal paste, especially if you are water cooling (even with an AIO).
Overclocking
I use MSI Afterburner to control GPU settings and AMD Ryzen Master to control CPU settings.
For gaming I was getting good temperatures now for the CPU and GPU. CPU temps can still get above 80°c so there isn't much room for overclocking, but at least it is now able to boost up to 4800-4900Mhz with the stock settings. GPU temps were in the 50-60°c range while gaming. I was able to bump the power limit to 107% (max in Afterburner for my 3080) and +90MHz core frequency. The GPU now boosts to 2100MHz under full gaming load and I am quite satisfied with that since the advertised boost clock for this card is only 1755MHz. At this overclock GPU temp sits around 65°c while gaming.
Basic Gaming Performance
I'll give a quick rundown about some of the performance numbers I have been seeing in games and the graphics fidelity settings I use. I am using a 4k 60Hz display so my FPS target is a solid 60FPS. I haven't been concerned with framerates beyond that since my display cannot handle it, and at 4k resolution that works out pretty well for this hardware. I mostly don't use anti-aliasing in any game as graphics at 4k look really good without it.
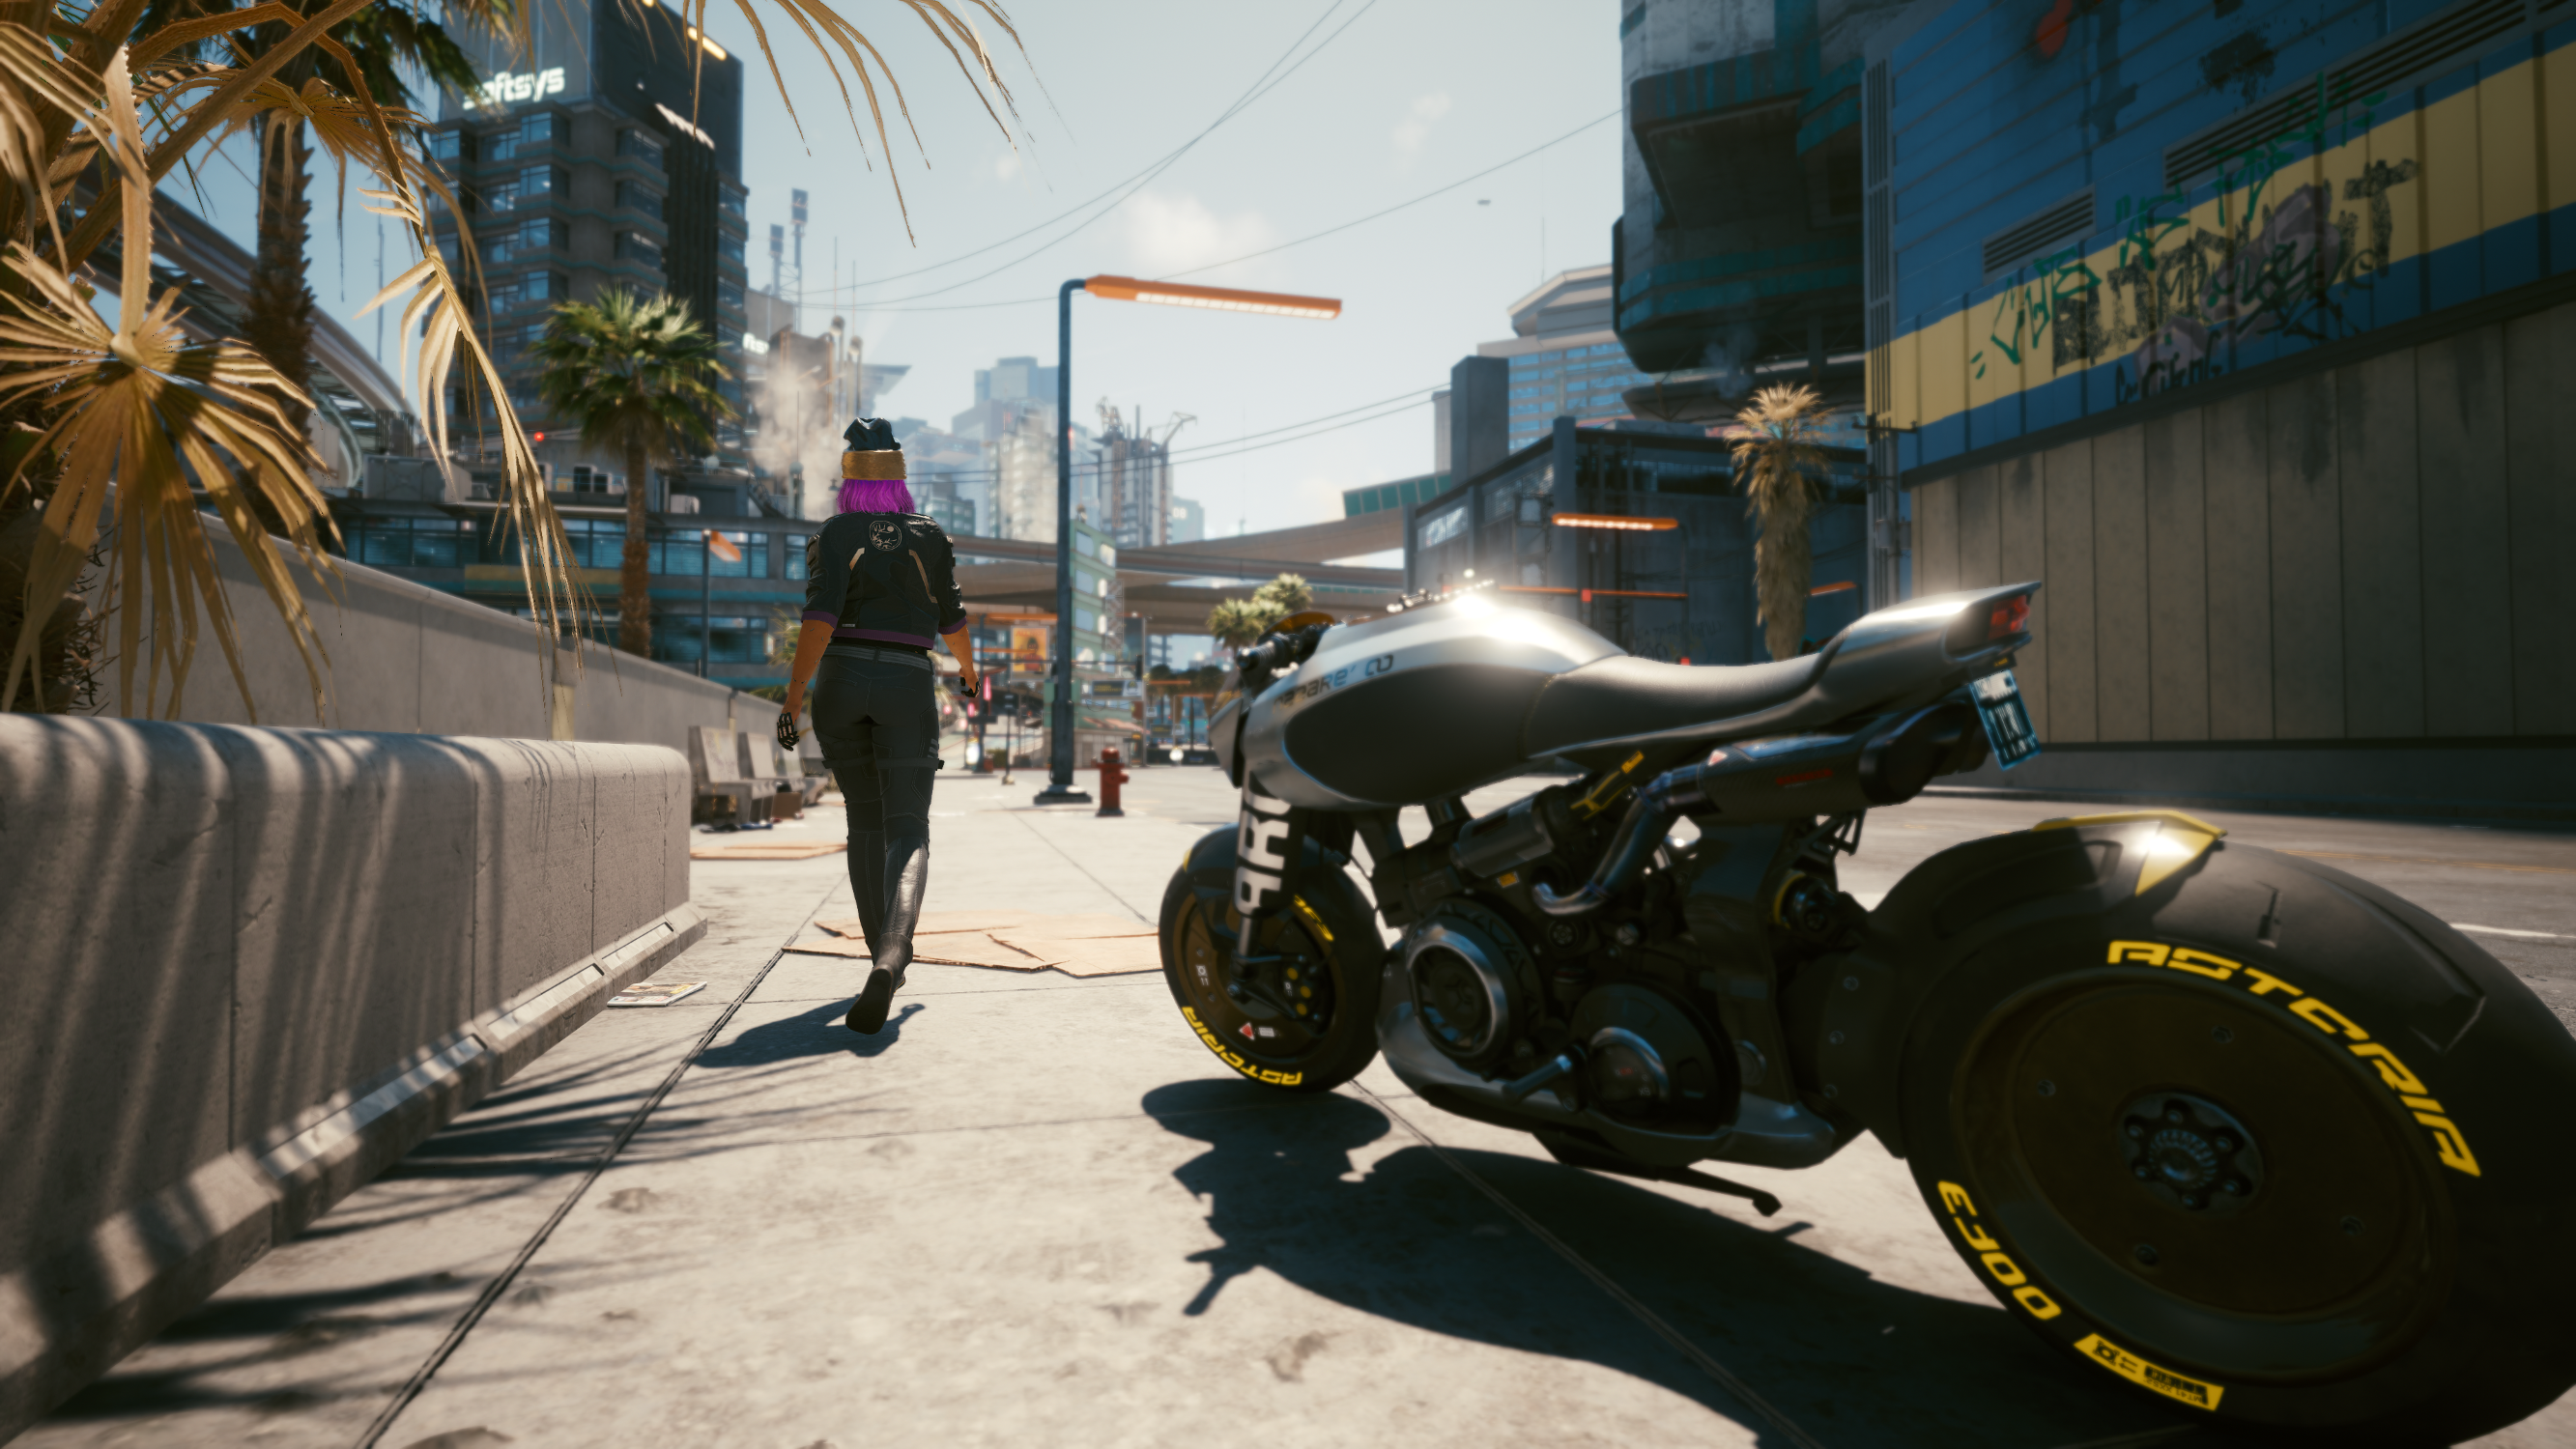
Cyberpunk 2077: This is the game I have been playing the most in the last couple months. I know it's been a disaster on consoles, but on PC it has been an amazing experience to play. I finished my first playthrough as a Corpo and now I am going to wait for some DLC content before starting another playthrough. I mostly play at 4k with Ultra settings, no ray-tracing, and the DLSS Quality preset. I usually get 60+FPS but it can dip down to 50-55FPS sometimes in demanding scenes. I likely could optimize it a bit more by bringing down the volumetric fog settings as those seem to have big performance implications. Sometimes I switch on ray-traced reflections as I find it really adds to the graphical fidelity but with a cost of around 10-15FPS (bringing me down to the 35-45 range).
Red Dead Redemption 2: I just recently picked this game up. It runs great at 4k Ultra settings getting 60+FPS. I went into the advanced options and increased a few settings (object and grass detail mainly). With the advanced detail settings I can still get 60FPS mostly with dips to 50-55FPS In demanding areas. I'm kinda glad I waited to play this game as it looks amazing running on the RTX 3080. My 1080 would not have done it justice at 4k if I played it when it came out 2 years ago.
Microsoft Flight Simulator: I haven't been to some of the most graphically demanding areas in the world but where I have flown I've seen framerates hovering between 50-60FPS at 4k Ultra settings.
World of Warcraft: Even though this game is 16 years old, it can still manage to bring a modern gaming PC to it's knees. In the newest areas which are usually quite demanding graphically (Shadowlands expansion 9.0), I can get 60+FPS with 4k Ultra settings and no ray-tracing. Adding ray-traced shadows drops the framerate by 10 and doesn't provide much fidelity, so I don't use it. Where this game really hurts is in cities or large raids with multiple dozens of players. I still regularly see framerate drops down to 30-40FPS in these situations.
Project Cars 2 & Forza Horizon 4: I enjoy racing games from time to time. Both of these titles are running quite well at 4k Ultra settings, both getting a pretty solid 60+FPS.
Star Wars Battlefront 2: I just got this recently for free from the Epic Games Store, mainly just to play the short single player campaign before buying the newer Star Wars Jedi: Fallen Order. It runs great at 4k Ultra settings above 60FPS.
Elite Dangerous: Way above 60FPS at 4k Ultra settings.
Cities Skylines: This game is also a bit older now, runs great at 4k Ultra settings above 60FPS.
Crypto Mining, Underclocking & Undervolting
For mining I was still seeing quite high temps, especially on the CPU while CPU mining.
First I dialed in the CPU. Using Ryzen Master I set an all-core underclock of 3500MHz and brought the peak core voltage down to 1.075v. This made a huge difference to temperatures with little to no negative effect on hash rate. The CPU is hovering around 68°c while mining at 4.3kH/s with XMRig/RandomXmonero in NiceHash getting around 0.00000830 BTC/day (Jan 24 2021). Obviously this isn't very profitable but I don't mind running it given the temperature and other factors I will outline.
Next I dialed in the GPU. I started with NiceHash's recommended settings for the RTX 3080: -150MHz core, +900MHz memory, 68% power limit. I was getting around 93MH/s @ 230W with Excavator/daggerhashimoto. With some tweaking I settled on -320MHz core, +1300MHz memory, and 68% power limit, which got me 98MH/s @ 230W & only 54°c. This is getting me around 0.00022800 BTC/day (Jan 24 2021) which is decent.
For those than don't know, NiceHash is a marketplace where you can sell your hash power to the highest bidder. They mine the coins they want and pay in BTC, so all your payouts are in BTC. This may be less profitable than mining alt-coins directly and converting to BTC but it is trivial to set up and manage. And now NiceHash lets you withdraw far smaller minimum amounts (0.001 BTC) than before so there is less worry about having your coins in their wallets. I have been withdrawing weekly.
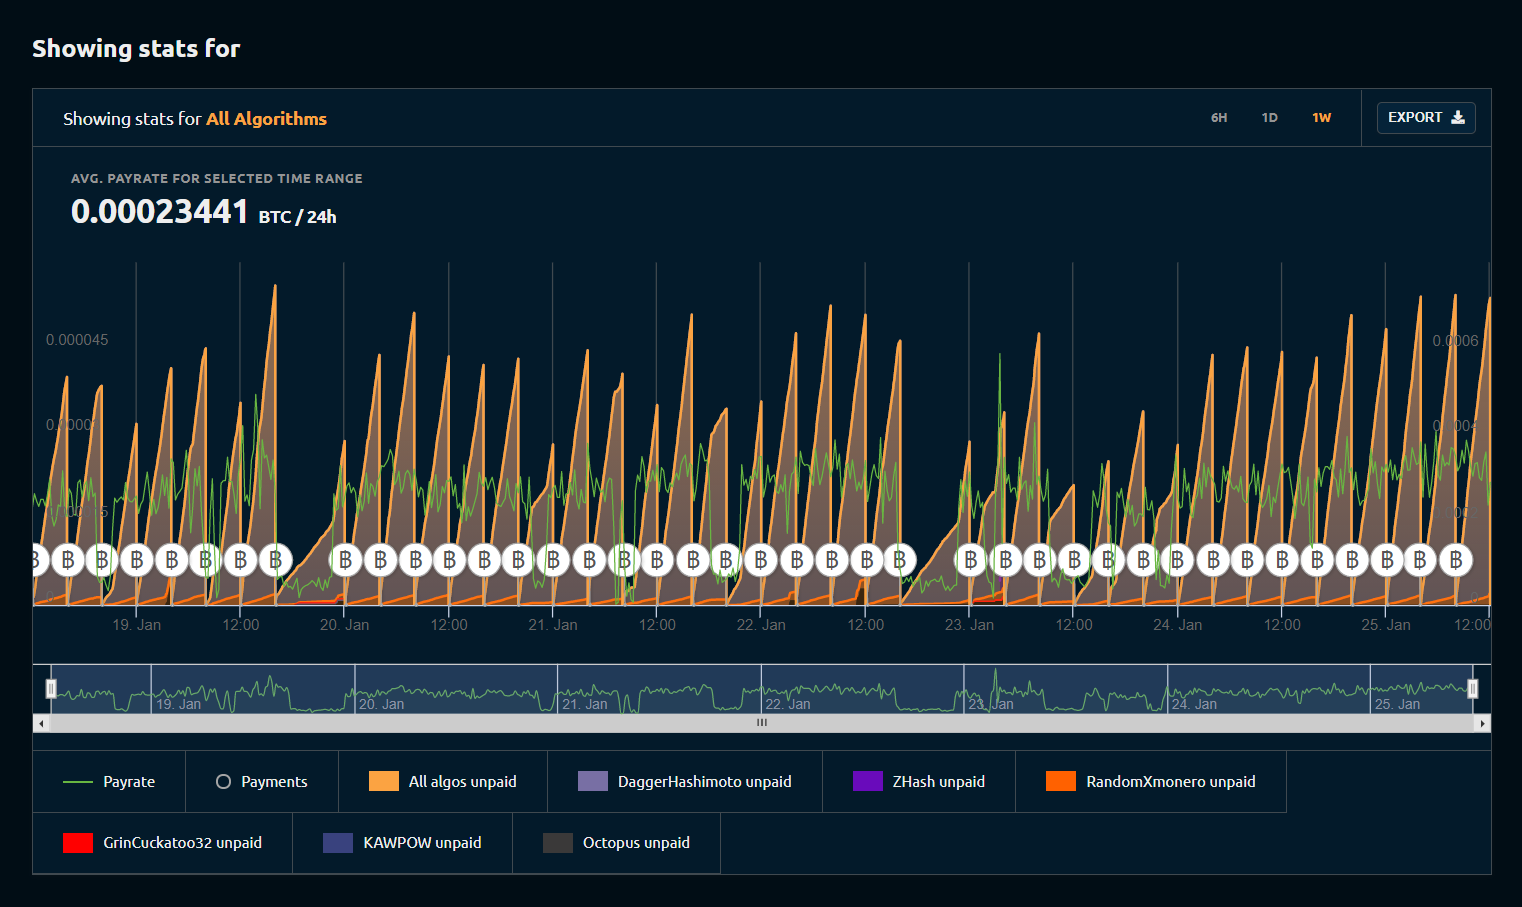
The above screenshot is the last week of NiceHash data for both my new and old gaming computers mining. The dips you see (green line) are when I am actually playing games and stop mining.
Since getting my RTX 3080 near the end of November 2020, and at current prices (Jan 24 2021), I've mined around $500 CAD in 2 months using the 3080. Currently I also have my previous gaming PC with a GTX 1080 still mining as well as my Ryzen 7 5800X, all together in the last 2 months I have mined around $600 CAD. And, being in Canada, there are at least 2 rooms in my house that I never have to heat this winter so the electricity cost is negligible.
If a few variables line up for you (reasonably cheap electricity, cold climate, electric heating in your house) and you have a gaming computer, I highly recommend mining when you are not actively using it. You may not turn a big profit but you will at least pay for your components over time. I've been mining constantly for over 3 years on my GTX 1080. Yes, 1 fan on it died, then the other one died, but you can get replacements on Amazon very cheaply. Just look at the model number on the fan to get the exact same one, or just zip-tie some generic case fans to the GPU heatsink (I've tried this and found it cools better than my stock fans, look up "deshrouding"). I have my old gaming PC with my GTX 1080 living in our sunroom right now without a monitor under a bench just keeping it warm in there for our plants.
Conclusion
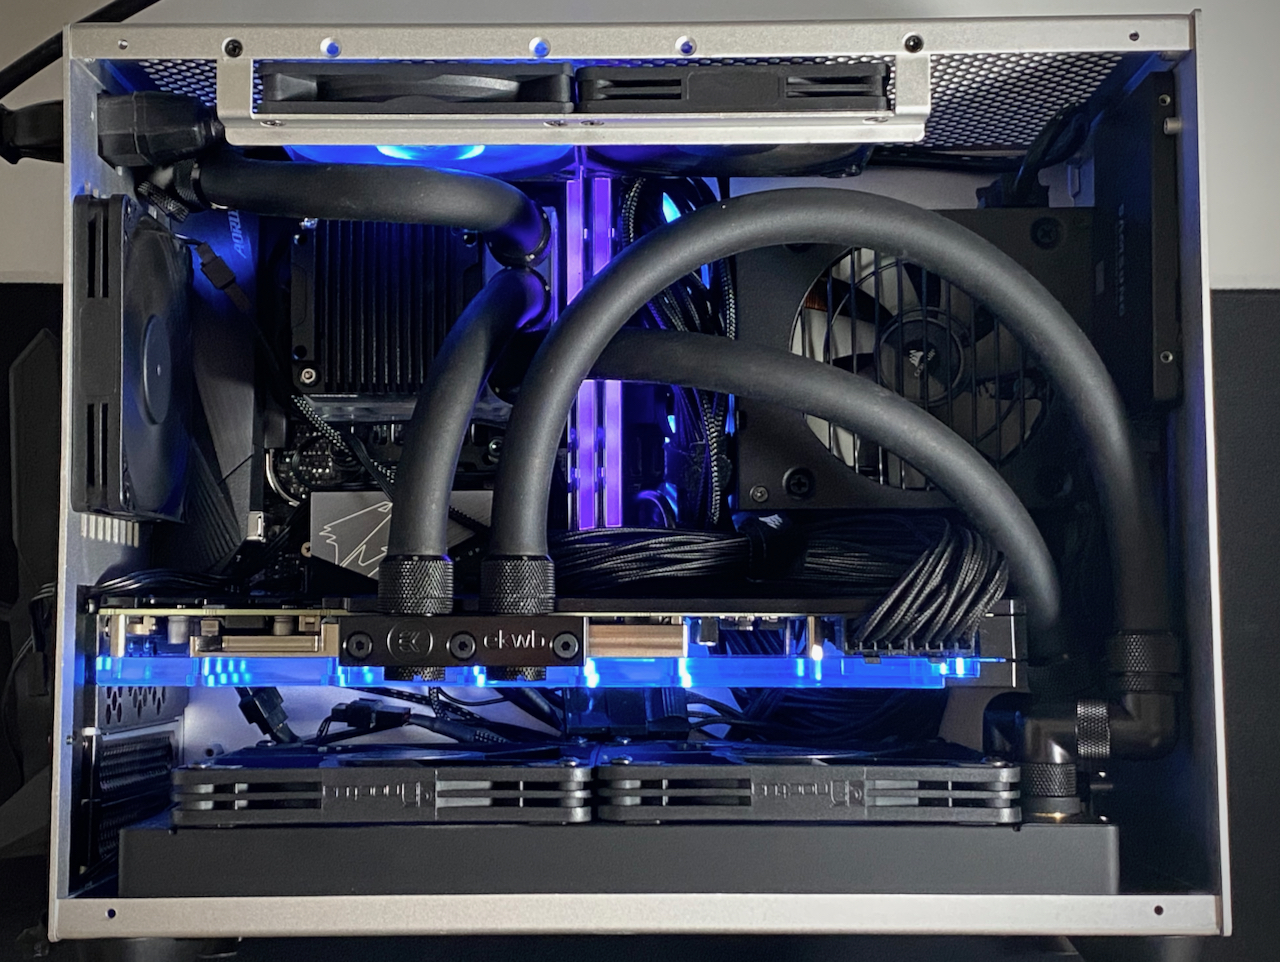
This project was a lot of work. A lot of it because of my choice in case. The Metalfish S5 looks nice and is made of decent materials, but it offers none of the conveniences of more expensive cases. Cable management was a pain and you cannot hide everything. I really like the clean look of it while still having the glass side panel.
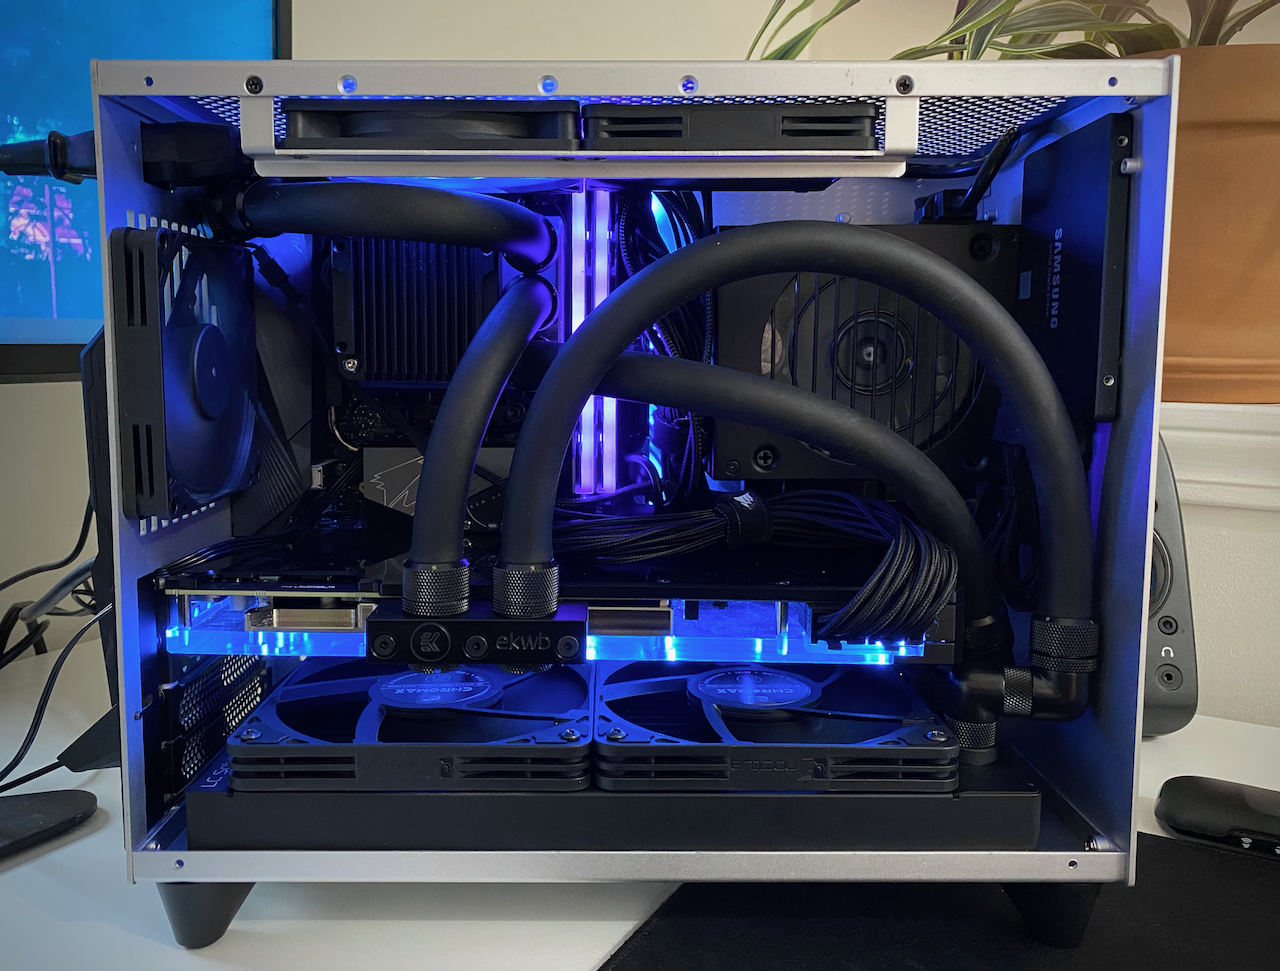
I love how the interior looks with a mostly black utilitarian look with the black tubing but still with accents of light on the memory and GPU block.
Some things I may try to do in the future are:
- • Try to incorporate additional cooling into the loop. Either with AlphaCool's 92mm radiator or something more custom with their skinny server radiators on the top of the case
- • Paint a small black border around the inside of the glass side panel
- • Get the LEDs on the CPU block working
- • Get PWM control of the pump working and get rid of the manual dial
- • Get a fluid temperature sensor and a fan controller with temperature sensor input so that I can control the fans based on the fluid temperature rather than the CPU temperature
I am very happy with how it turned out overall. If you have any questions about the build feel free to comment on the corresponding reddit post. Also thanks if you made it this far! Sorry this turned into 5000+ words!