Node CI/CD Pipeline using GitHub Actions & AWS Elastic Beanstalk
May 30, 2020
#github-actions#cicd#typescript#aws#automation
Here is my journey into creating an automated workflow to test, build, and deploy a project I have been working on using Github Actions and Elastic Beanstalk.

Tl;dr
- Background: I was converting a JavaScript project to TypeScript and I decided to set up continuous integration and continuous deployment at the same time using Github Actions.
- Testing: I am using Mocha for the first time to run my TypeScript tests.
- Automation: The intention is to create a Github workflow that will test my code, build my project, and deploy it to Elastic Beanstalk automatically whenever I push to the master branch.
- Create a new IAM user: First step is to create a new AWS IAM User to automate interactions with AWS.
- Save AWS User credentials in Github: Github provides and encrypted secret store that you can use to securely access 3rd-party credentials within a Github Workflow.
- Create a S3 bucket to store deployment artifacts: Setup a bucket to store our deployment artifacts so they can be easily deployed and archived.
- Create an Elastic Beanstalk Application and Environment: Create an new application and environment that we can deploy our app to.
- Create a Workflow file within your repo: Workflows live in your repo in the .github/workflows/ directory.
- Setup the yaml file: Setup your workflow with a trigger and some environment variables for readability and maintainability.
- Test job: A job that will test our project.
- Build job: A job to build our code, bundle it in a zip, and push that to AWS S3.
- Deploy job: A job to deploy our project to Elastic Beanstalk
- Testing the workflow: Push this new workflow file to your master branch and see the workflow in action.
Background on the project
I have recently been working on converting my JavaScript battlesnake over to TypeScript. This can be done in a gradual process but I've been finding that difficult to do, so this was more of a tear of the band-aid quickly kind of situation.
I decided that I would use Deno for this project rather than Node. Deno 1.0 had just recently come out and I was all over that hype train. I really think Deno makes sense in it's core philosophy. It also happens to not only have TypeScript support by default, but the strictest possible TypeScript support is default. This encouraged me to translate my JavaScript to TypeScript properly and to fix some of the wrong design choices I had made over the last two years.
Eventually I became frustrated with Deno's, frankly, lack of polish. It isn't a true 1.0 if basic features, like fetch, don't work correctly yet. Over the course of around two weeks of using Deno I got to the point where I decided to just take all the TypeScript I had just written and move it back to Node.
Hopefully I will have by now put together a small article here about migrating a JavaScript Node project to TypeScript. If not check back soon!
Testing
During development of my Deno TypeScript battlesnake I actually already set up automated testing using Github Actions. That worked really well and Deno's included test runner is really simple and easy to use.
Bringing my tests over to Node I used what seems like the most popular option which is Mocha. I've never used it before but it seems fine.
I can run my tests with the following command which I entered as a test script within my package.json:
mocha -r ts-node/register src/tests/**/*-test.tsGreat. So with this in place my project is back to a place where I can run it locally, test it, and build it for deployment to AWS.
Automation
Beyond automating testing when pushing to my master branch I decided to give the whole CI/CD pipeline a try. I use AWS Elastic Beanstalk to host my project and up to this point I have always been manually zipping the production build and using the AWS Web Console to manually deploy that to Elastic Beanstalk.
Now I have fully automated the whole process!
Using Github Actions, whenever I push to my master branch I have 3 jobs that run:
- The repo is tested with my suite of tests using Mocha
- If the tests pass, the project is built, zipped, and pushed to AWS S3
- If the tests and build are successful, the zip is deployed to AWS Elastic Beanstalk.
If this fails at any point I get an email and red warnings on Github notifying me.
Github actions are powerful and you can do far more complicated things than I am doing. But if this interests you, or lines up with a project you are working on, read on and I'll go over step-by-step how I did this.
Create a new IAM User
I decided to create a specific IAM User for Github Actions, and specifically this repo.
Log into you AWS Console using your admin account (you created an admin account right? Try not to use you root account) and navigate to IAM.
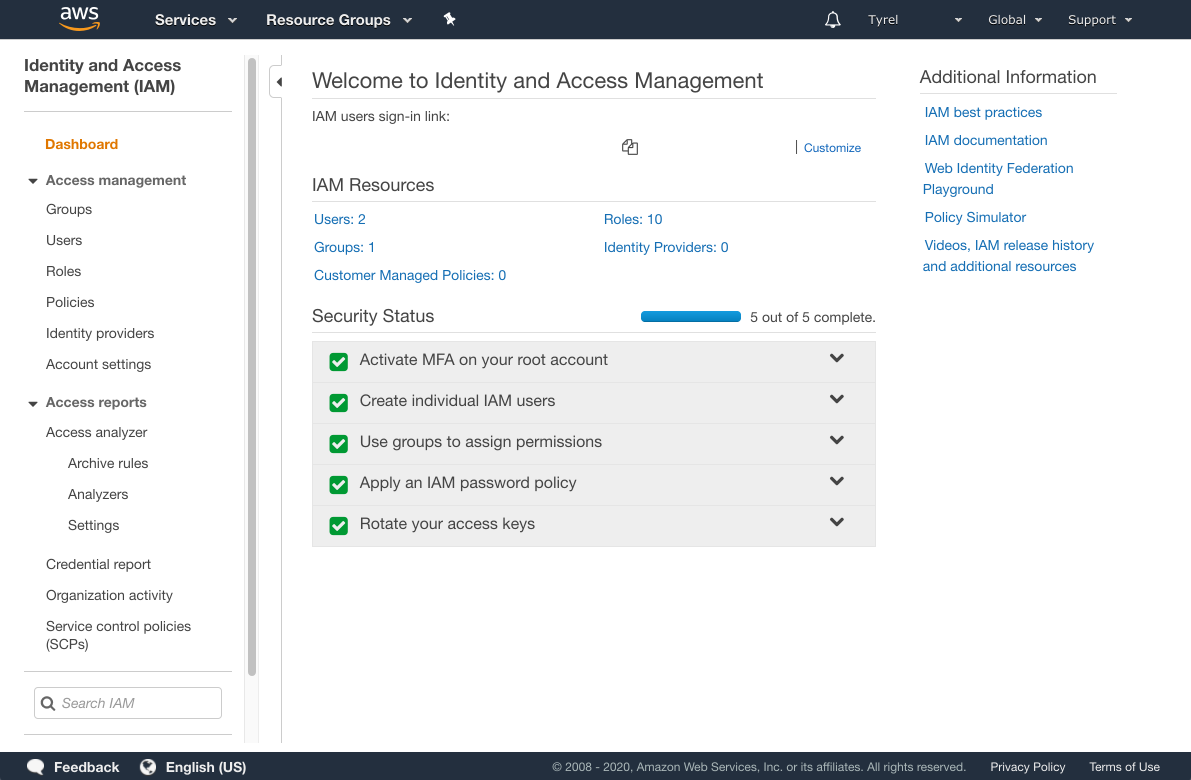
Click on Users and then Add User.
Choose a name that makes sense to you. For example github-actions-battlesnake-test makes sense in my case as this user exists to authenticate Github Actions for my Battlesnake project. Be as specific as you would like, the name doesn't matter too much.
Also choose programmatic access as the access type. This will allow us to generate an access key ID and secret key that we will pass to Github Actions so that we can use the AWS CLI.
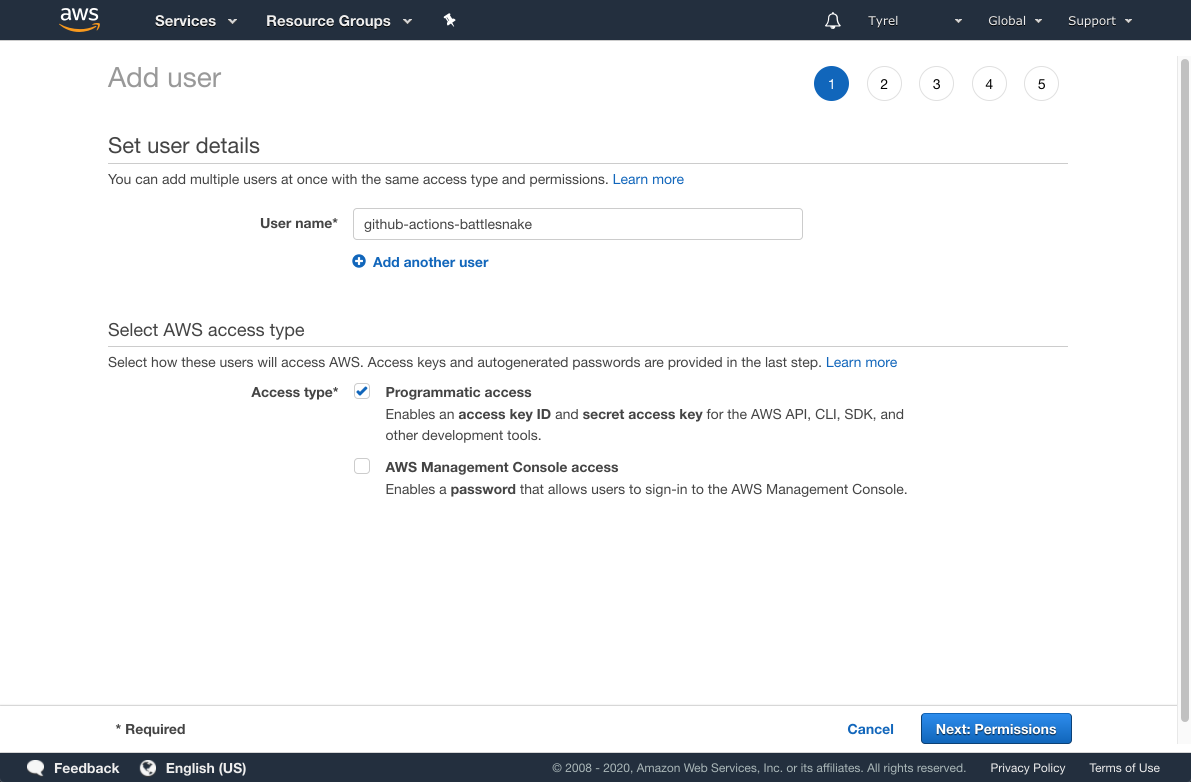
Then click Next: Permissions.
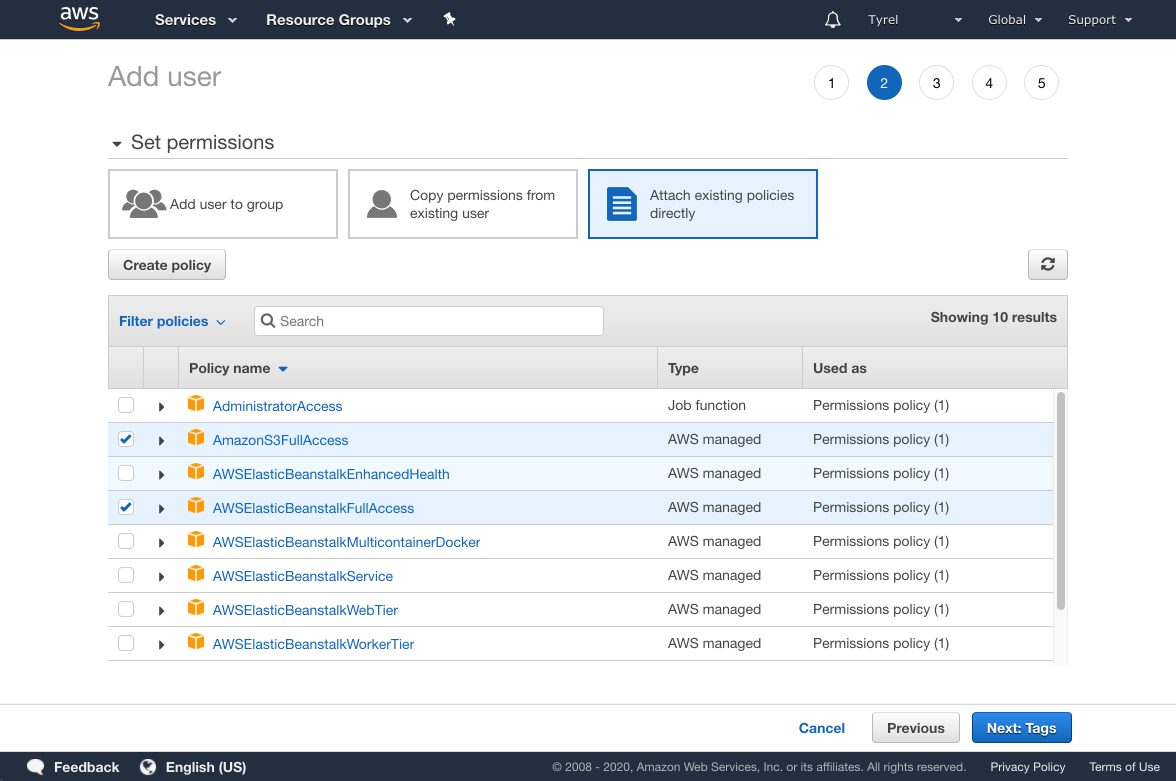
On the next screen choose Attach existing policies directly. In the future you may want to to create a Group or Role to house these permissions and add this User to that Group or grant them that Role. For now, applying the permissions directly to the User will work fine.
You want to grant this user permission to use S3 and Elastic Beanstalk. Search for "s3" and check the option called AmazonS3FullAccess. Next search for "elasticbeanstalk" and check the option for AWSElasticBeanstalkFullAccess. You can probably grant even more granular access than these for this account, but I'll let you sort that out if you like. Double check you have the correct permissions selected and then click Next: Tags.
You can give this User tags if you wish, or leave it blank. Click Next: Review.
Double check that everything looks as you expect and then click Create user.
Important❗This page shows your new user's access key ID and secret key. This is private information that you should strive to keep private. Someone who has access to this information has access to use this user and anything you have granted it permission to use.
We want to save this info as a secret on Github. I would recommend not saving this in any other way as you are likely to forget about it or mishandle it. The keys shown in this article and these screenshots have long been deactivated before this post went live.

While leaving this tab open, open a new tab and navigate to the Github repo of your project.
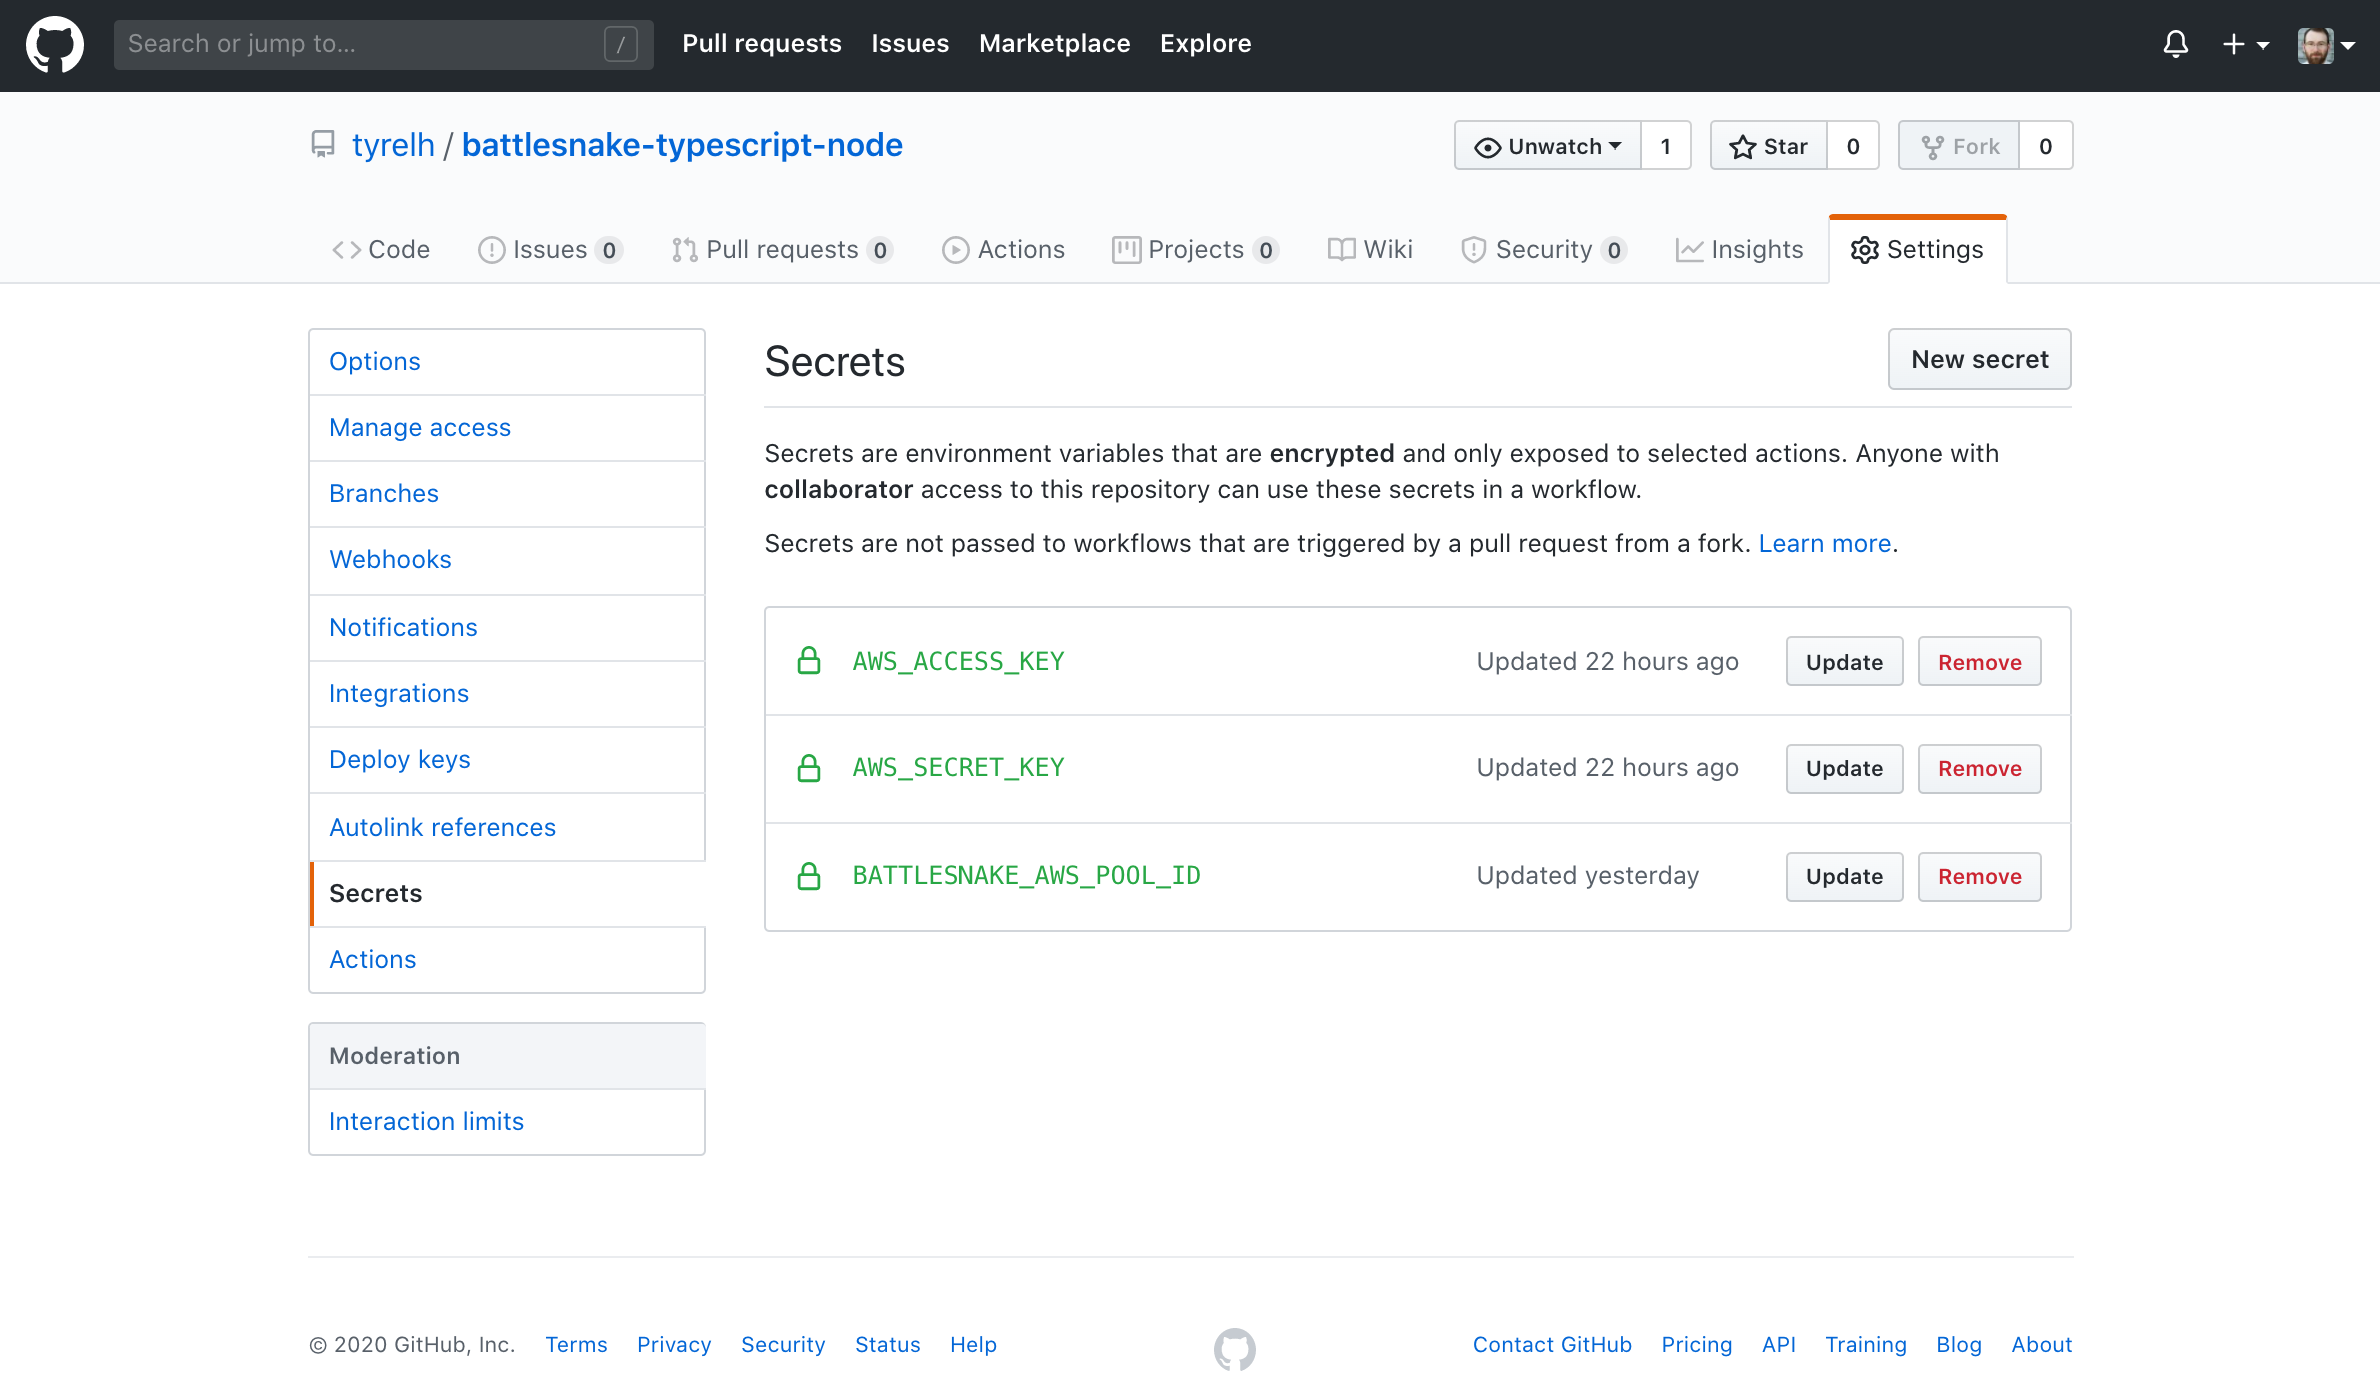
Save AWS User credentials in Github
Next you want to save these AWS credentials as a Secret on your Github repo. This will allow you to securely access them in your Github Workflow later on.
In the Github repo of the project you want to automate, click the Settings tab near the top right of the page. Choose Secrets in the left menu. Then click the New Secret button in the upper right.
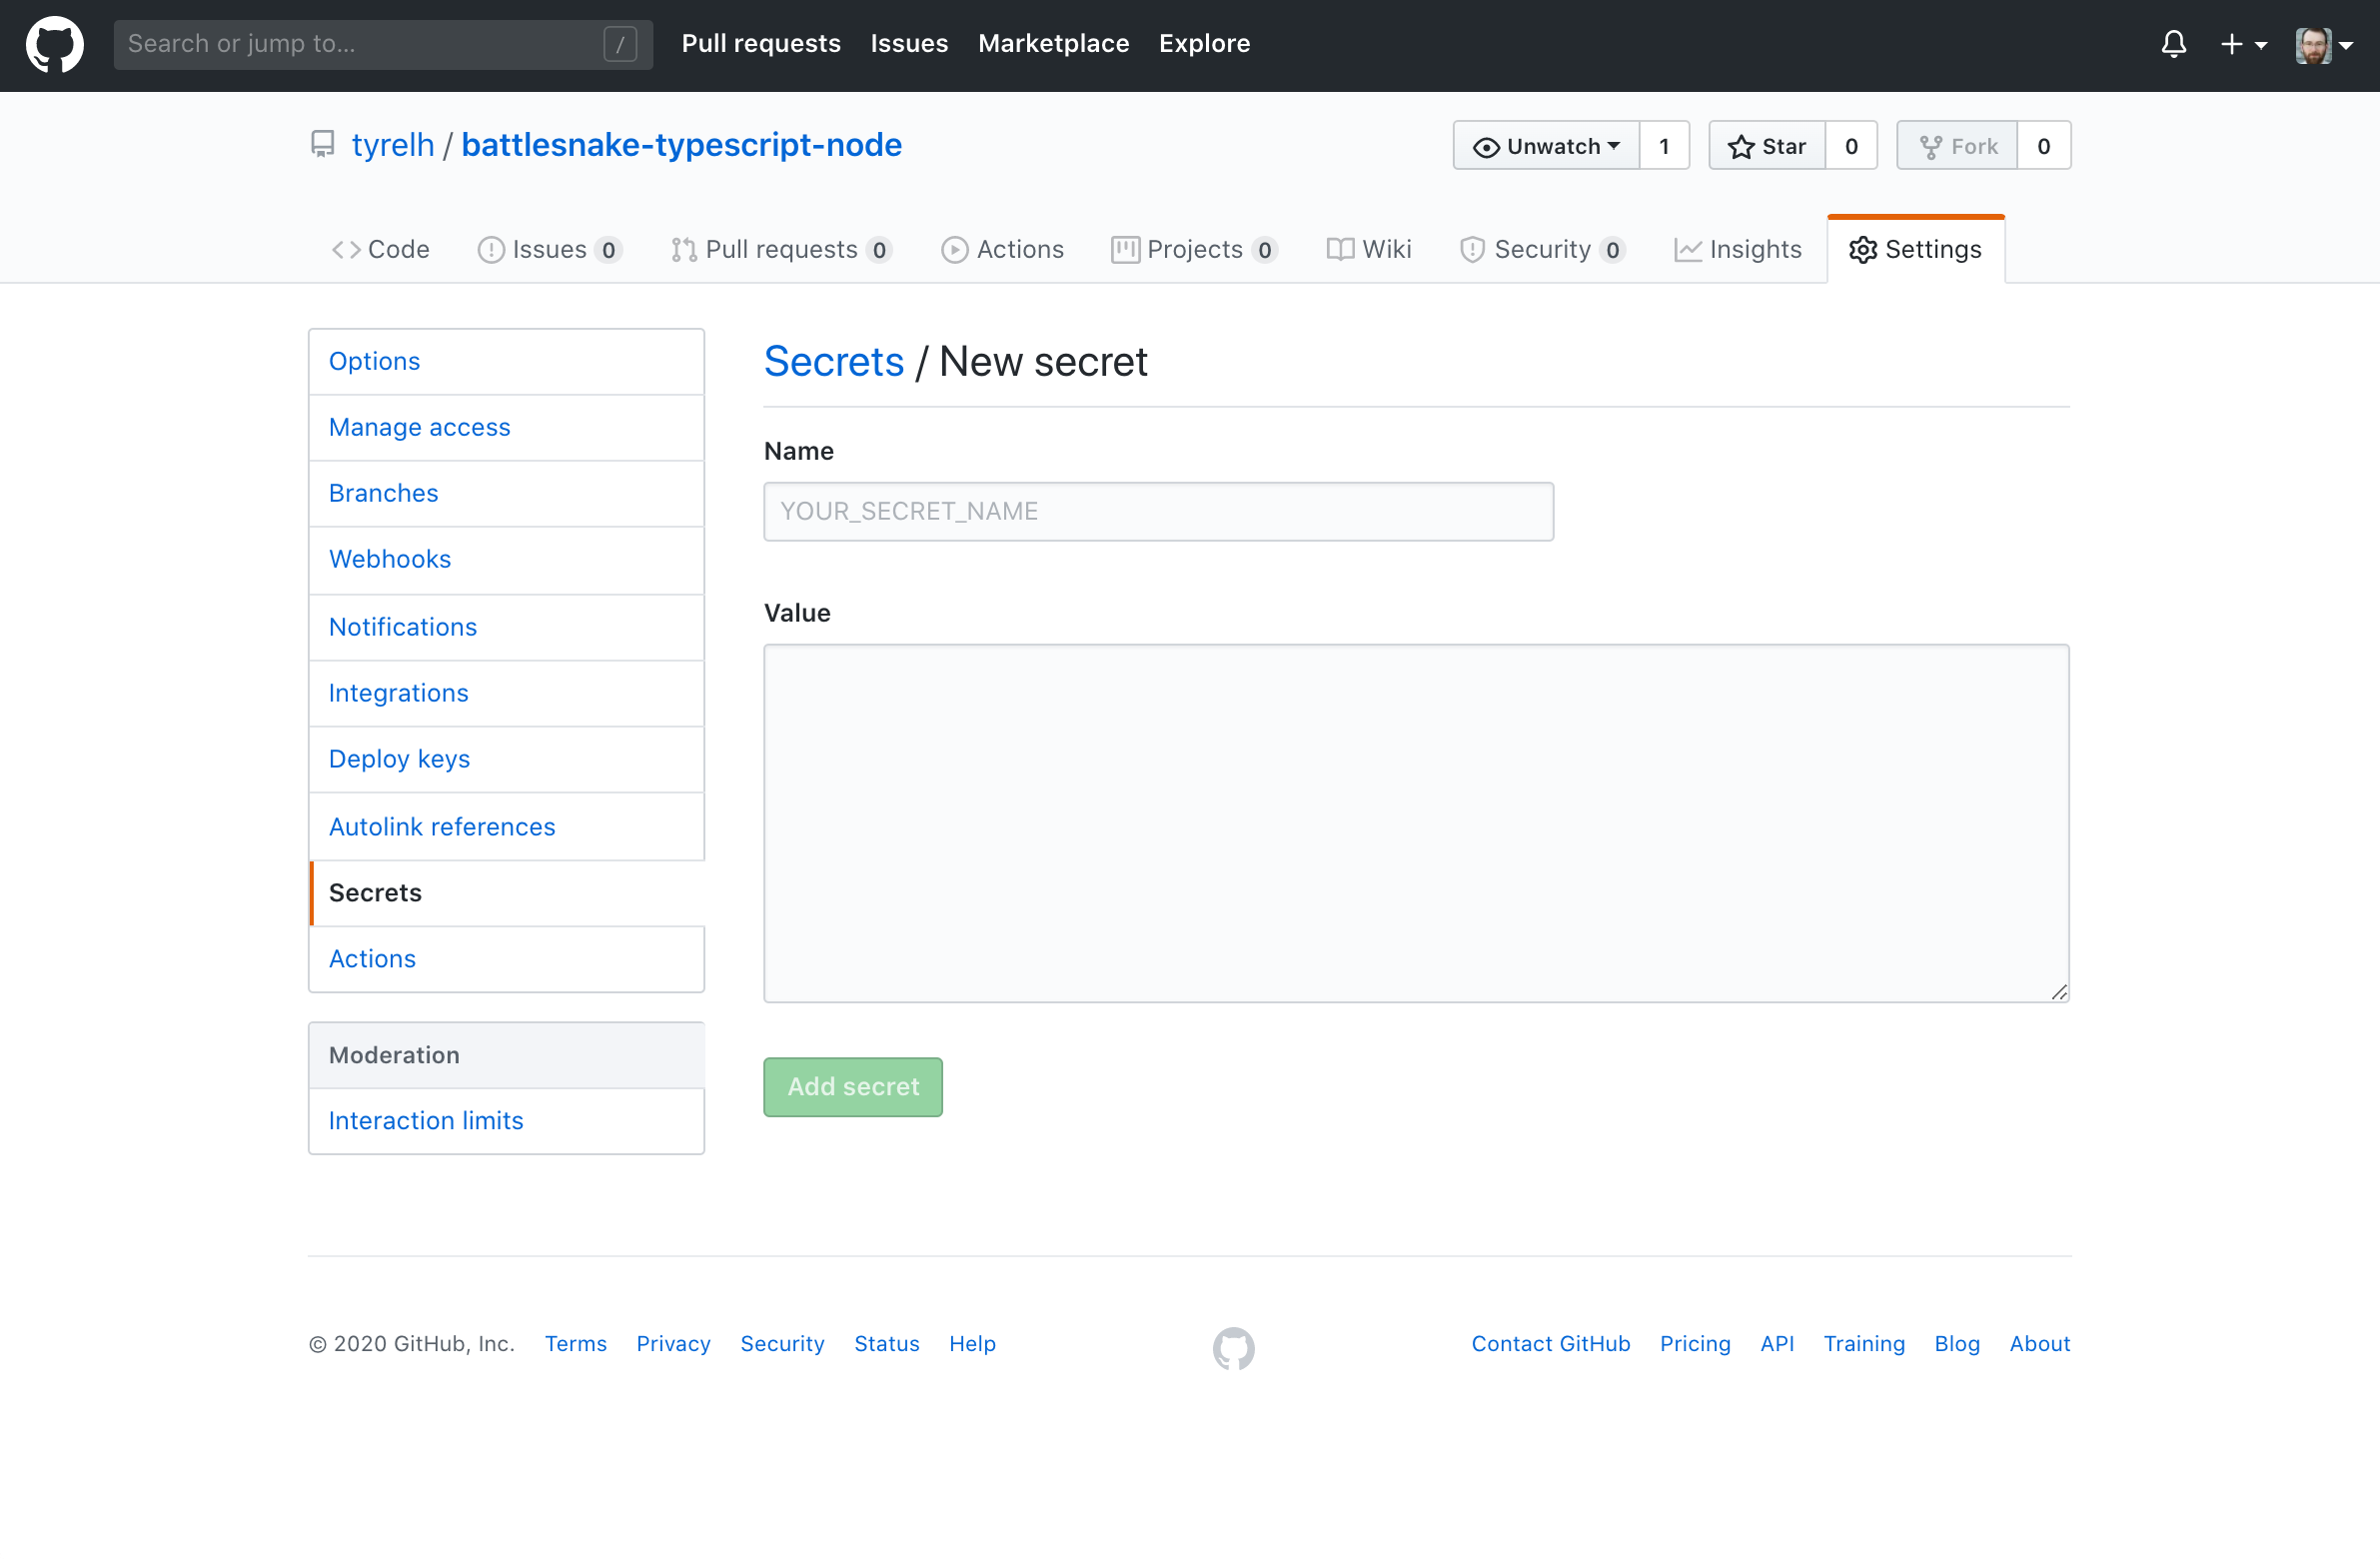
Copy your access key ID from the AWS Console tab you have open into the Value field. Give it a name that makes sense to you such as AWS_ACCESS_KEY_ID. I believe this name just needs to be unique to this repo and not your Github account. Double check that you copied the access key ID over correctly and then click Add secret.
Do the same for the secret key, naming it something like AWS_SECRET_KEY. Make sure you double check that you copied the secret key over correctly as once we are done with this process these keys are no longer accessible. If you make a mistake somewhere through this key transfer you can invalidate those keys and generate new ones.
Thats it for the user creation! Next we want to prepare a couple other resources in AWS.
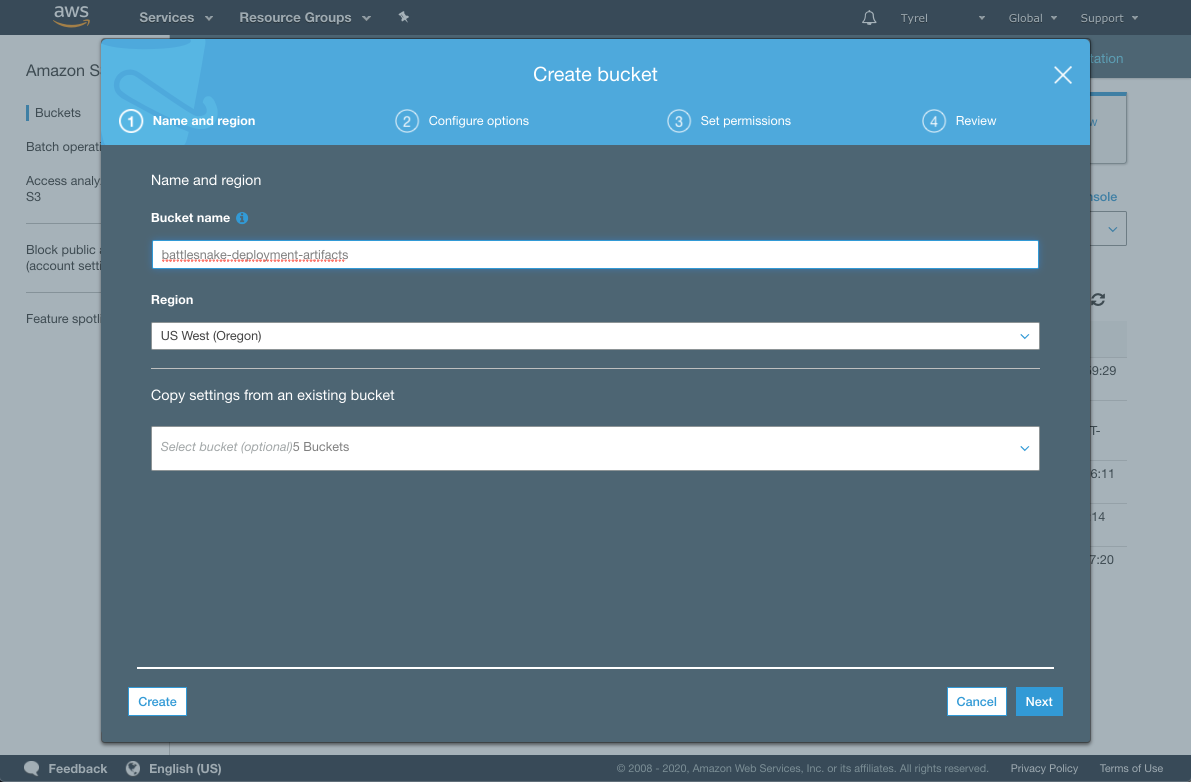
Create a S3 bucket to store deployment artifacts
We are going to store our deployment artifact in S3 so we can easily deploy it to Elastic Beanstalk. Let's create that bucket now.
In your AWS Console, navigate to S3. Click the Create bucket button.
You will need to choose a globally unique (or region unique? I can't remember) name for your bucket. The UI will warn you if you need to pick a different name. Call it whatever you like, and make note of the name you choose. Click Create.
Create an Elastic Beanstalk Application and Environment
Next we want to create an Elastic Beanstalk Application. In the AWS Console, navigate to Elastic Beanstalk.
There are many different states your Elastic Beanstalk Console can be in so it is hard to say exactly where this option is but you want to Create a new application.
Choose a name and click Create.
Next you want to create an Environment within this Application. With the Application you just created selected, find the option to Create a new environment.
Choose Web server environment and click Select.
Choose a unique Environment name and Domain. I use this URL for my Battlesnake application so I choose something that is easy to use.
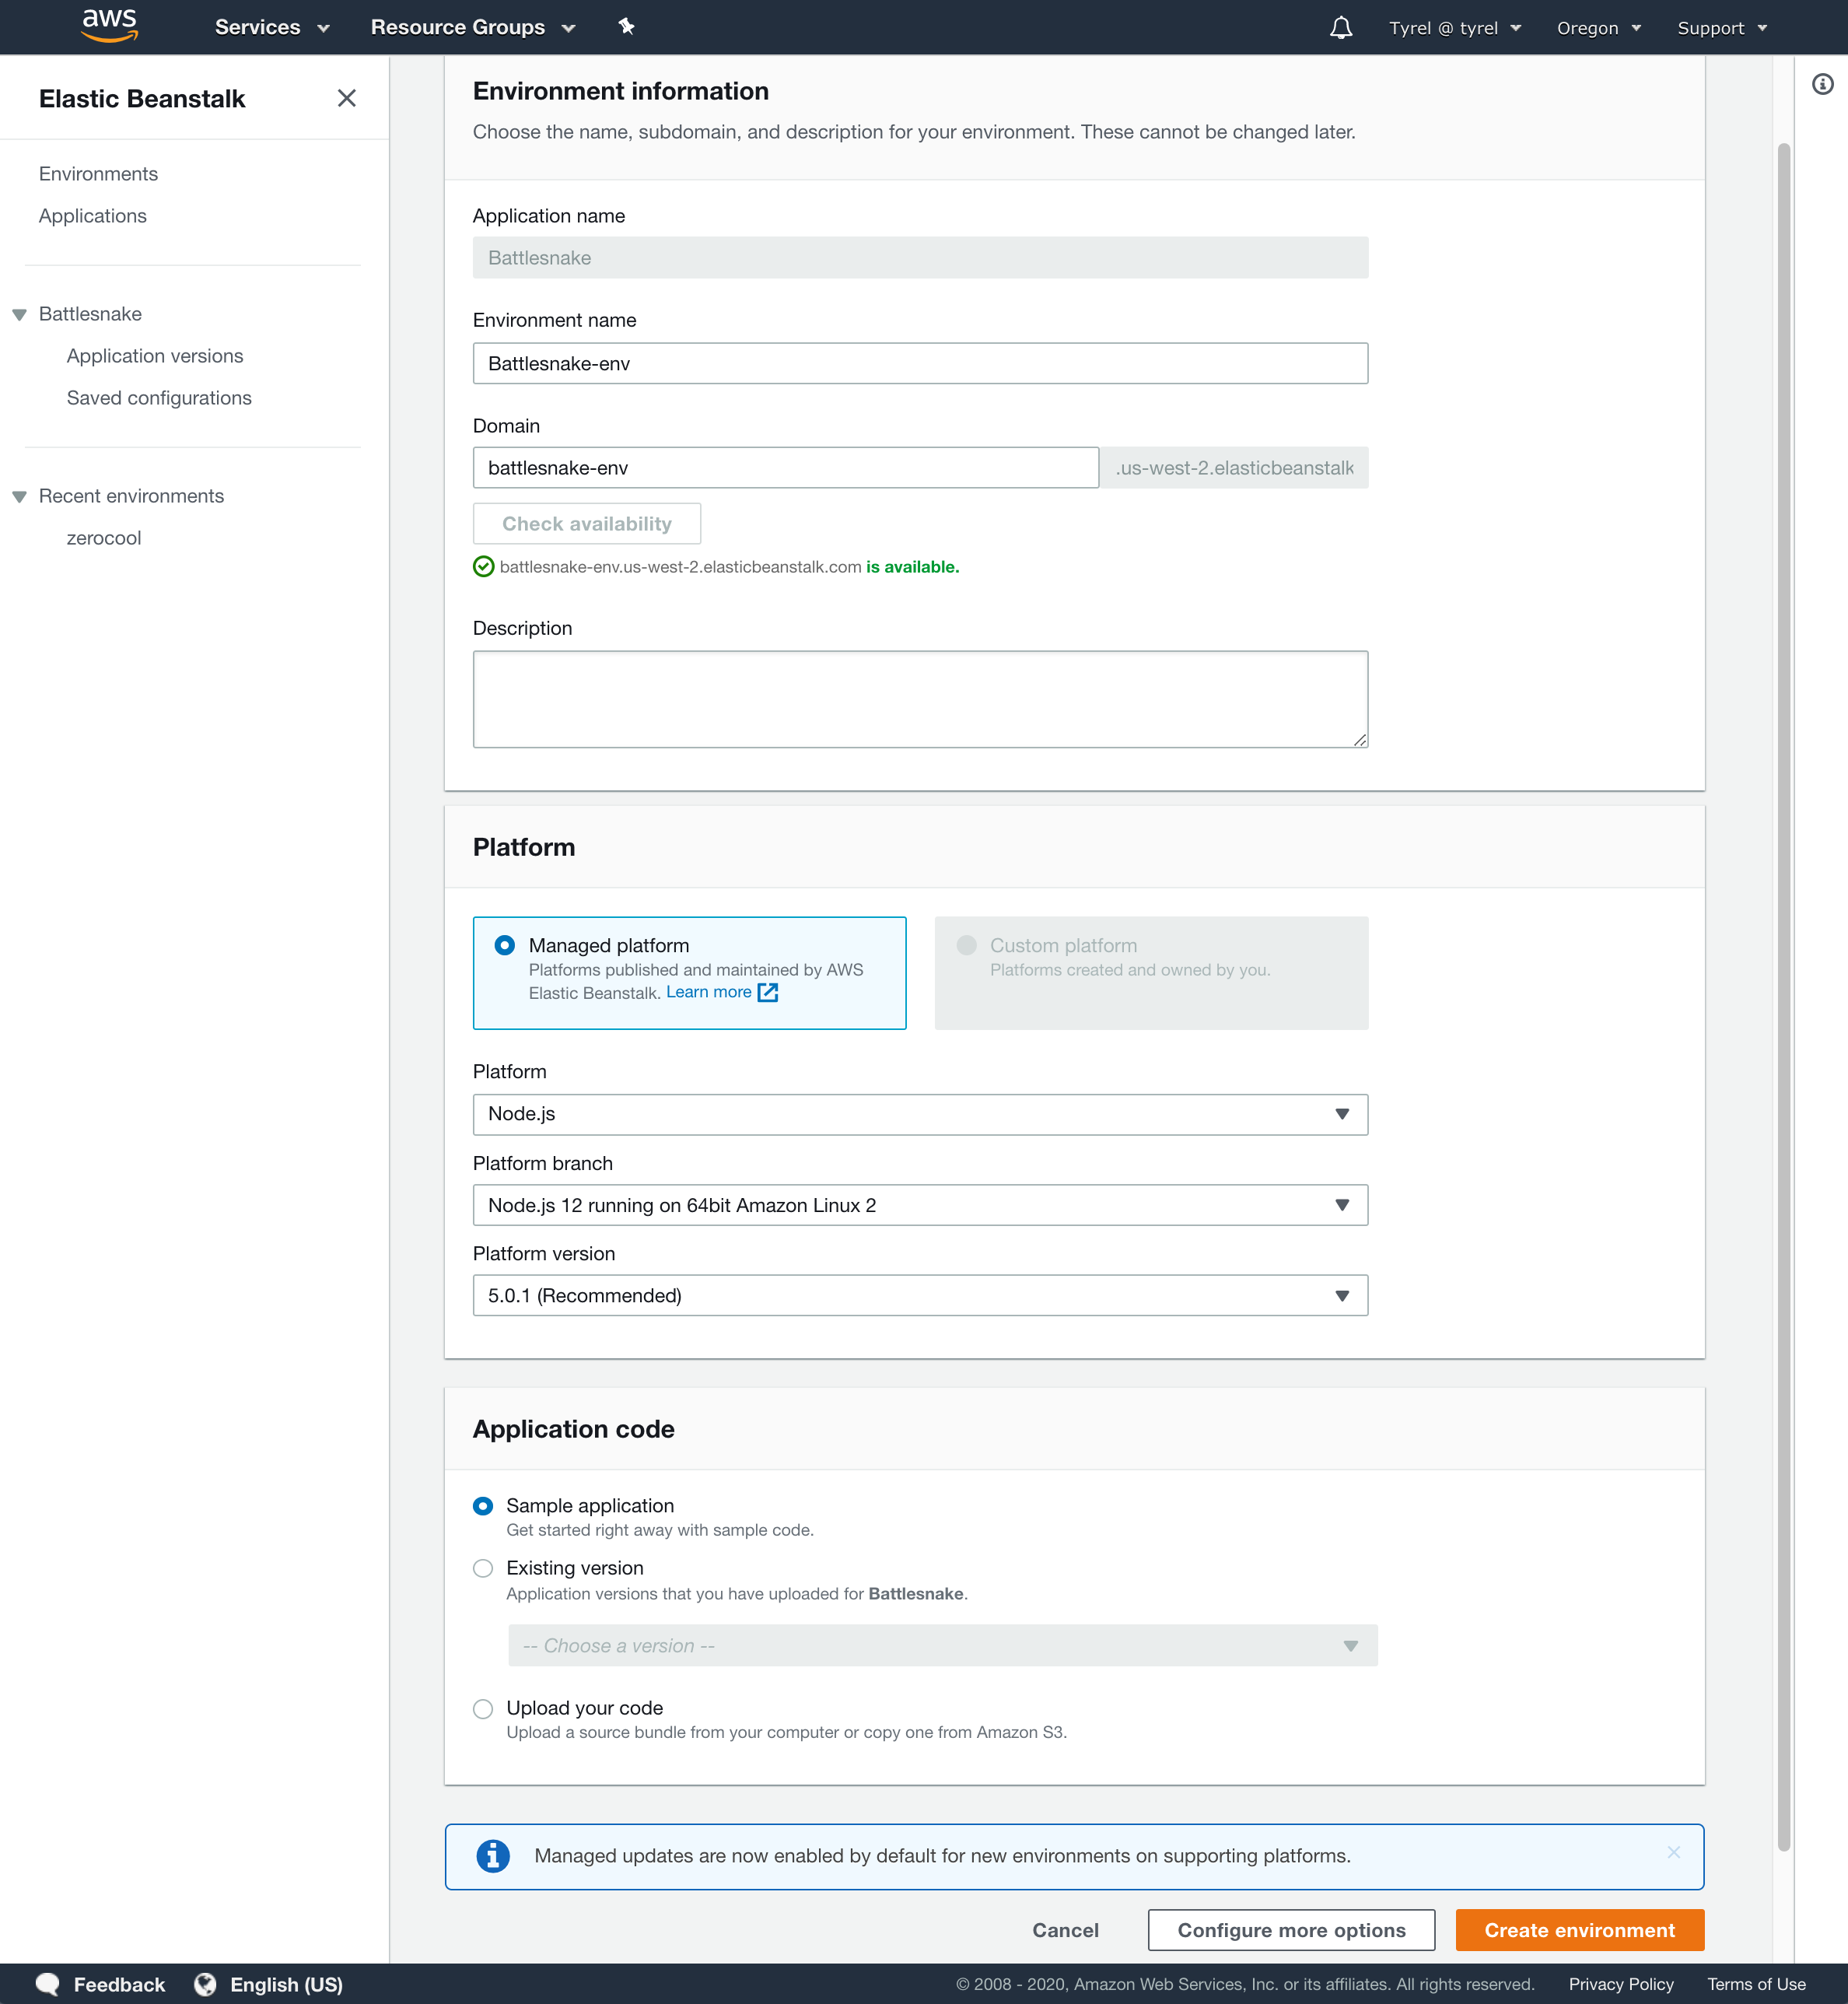
In the Platform section choose Node.js as the platform and leave the other options as their defaults. This will be different if you are running a different software stack or need a specific version of Node.
In the Application code section leave the Sample application selected. We will deploy our own application here in soon.
Click Create environment after you double check your details are correct.
Now we are done with the AWS setup. The last piece of this is to create a workflow in our repo that outlines the entire Github Action.
Create a Workflow file within your repo
Github Actions work off of workflows. Workflows are yaml files that live within .github/workflows/ on your master branch. These yaml files describe the series of actions you want to perform.
There are a few options for creating your first workflow yaml file. The simplest is to use the Github GUI. You can click the Actions tab from within your repo. Find the option that says Skip this and set up a workflow yourself. This will present you with a web editor and a skeleton workflow file.
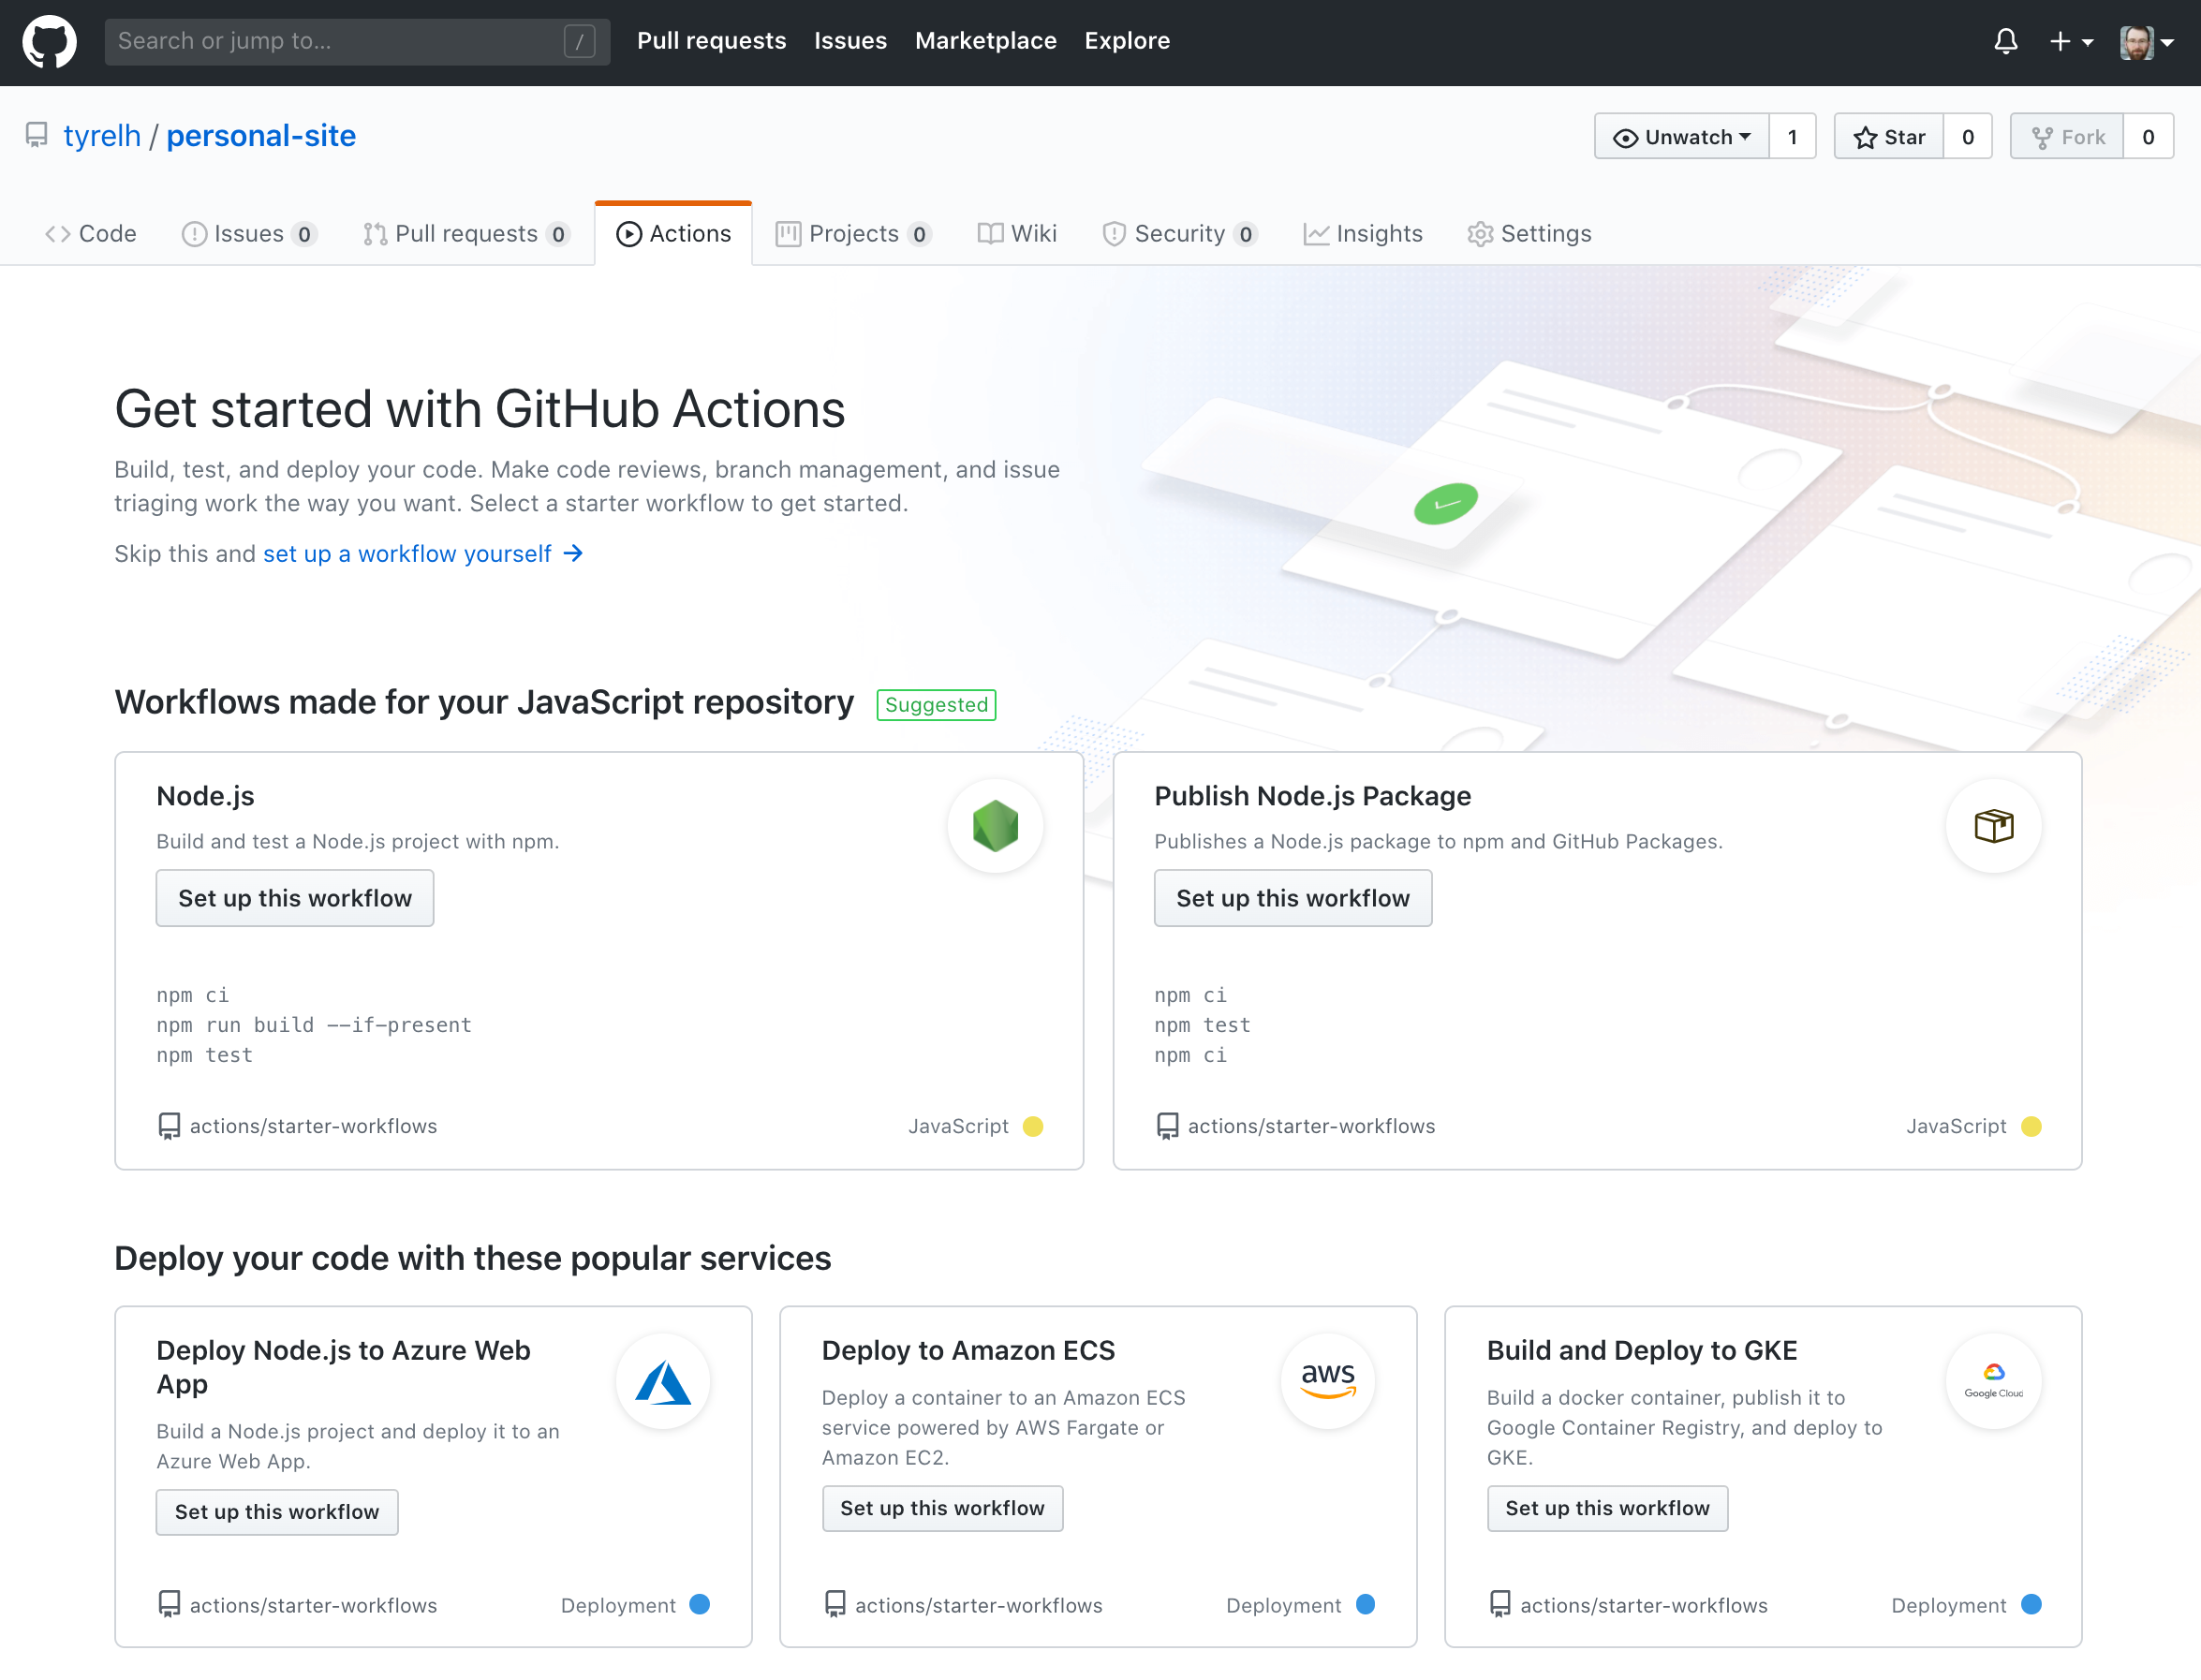
The other option is to just use whatever IDE or text editor you normally use and create a new yaml file in your repo within .github/workflows/.
I am going to start from a blank file to describe what each piece means.
Setup the yaml file
If this yaml file gets confusing at all just reference the Github docs for the proper syntax.
The first line of your workflow file is the name of your workflow. Choose a name that describes what this workflow is doing, be as specific as you like.
name: CICD_PipelineNext we are going to set up some environment variables to make the rest of this file cleaner and more maintainable. I have seven environment variables total in my workflow. These get placed in the env namespace.
The first two are taken right from AWS Elastic Beanstalk. We want to save the Elastic Beanstalk Application name and Environment name that we created earlier. Make sure these are exactly the same as you used when setting up the Application and Environment.
EB_APPLICATION: "Battlesnake"
EB_ENVIRONMENT: "Battlesnake-env"
Next You want to create a variable for your S3 bucket name.
EB_DEPLOY_ARTIFACT_S3_BUCKET: "battlesnake-deployment-artifacts"Add a variable for the AWS region you are using.
AWS_REGION: "us-west-2"And lastly we will add 3 strings that we will use during the build and deploy process. These will use the the latest commit hash from our repo to create unique strings for deployment versioning. The commit hash can be accessed via ${{ github.sha }}.
EB_VERSION: "Version-${{ github.sha }}"
EB_DESCRIPTION: "CommitSHA-${{ github.sha }}"
DEPLOY_ARTIFACT: "battlesnake-${{ github.sha }}.zip"
So so far we have a name for our workflow and a series of environnement variables that we can use.
Next we want to describe the trigger we want to use to initiate our workflow. This is one of the reasons Github Actions are so powerful as there are so many different triggers available. We simply want to trigger this action whenever we push to our master branch. You describe your triggers in the on namespace like so:
on:
  push:
    branches: [ master ]
So putting all this together, our yaml workflow should look something like this so far:
name: CICD_Pipeline
env:
  EB_APPLICATION: "Battlesnake"
  EB_ENVIRONMENT: "Battlesnake-env"
  EB_DEPLOY_ARTIFACT_S3_BUCKET: "battlesnake-deployment-artifacts"
  AWS_REGION: "us-west-2"
  EB_VERSION: "Version-${{ github.sha }}"
  EB_DESCRIPTION: "CommitSHA-${{ github.sha }}"
  DEPLOY_ARTIFACT: "battlesnake-${{ github.sha }}.zip"
on:
  push:
    branches: [ master ]
Test job
With the basics of our workflow file setup we can get into the interesting bits. A workflow file can have a series of jobs that Github can run in parallel or in sequence. For our purposes we are going to have 3 jobs, test, build, and deploy, that we want to run in sequence where each job depends on the previous job succeeding.
The first job we will create is the test job. This will simply run our test suite and report back if tests passed or failed.
Jobs are defined in the jobs namespace which is essentially a list of jobs, each starting with their name. You don't need to use the name keyword. I called this first job test.
jobs:
  test:
Now the first piece of a job describes what operating system you want to run this workflow on. Github has options for Ubuntu, MacOS, and Windows. We will use Ubuntu for our workflow.
runs-on: ubuntu-latestNext we want to describe the steps of this job. This is a list of steps each with a name describing what is being done. A step can be a predefined action that we reference from another repo or could be something like shell command. We can install almost any software we want and use it within our jobs via shell commands.
steps:The first step we want to do is to pull down our code from Github. For this we can use an action provided by Github to handle that easily. actions is a Github owned organization, checkout the repo we want to use, and @v2 is the version tag. By adding this action we now have access to all our code in our repo.
- name: Git clone repo
  uses: actions/checkout@v2
Since our project uses Node, we want to install that next. We will use another provided action called setup-node. We also specify the Node version that we want to use.
- name: Install node
  uses: actions/setup-node@v1
  with:
    node-version: '12.x'
Next let's install our project dependencies. We can use the run command to run npm as we would do on any other machine. We will use npm ci instead of npm install since we are in an automated environment. It's effectively the same just a bit quicker and cleaner.
- name: Install dependencies
  run: npm ci
Lastly, lets run our tests! Our environment is set up now so all we need to do is run our test command. I have this set up as a test script in my package.json to run my Mocha tests ("test": "mocha -r ts-node/register src/tests/**/*-test.ts"). So I just need to run npm run test. We pass an optional CI: true environment variable to ensure tests will fail the job if they throw warnings.
- name: Run tests
  run: npm run test
  env:
    CI: true
Putting this all together our workflow file should look like this:
name: CICD_Pipeline
env:
  EB_APPLICATION: "Battlesnake"
  EB_ENVIRONMENT: "Battlesnake-env"
  EB_DEPLOY_ARTIFACT_S3_BUCKET: "battlesnake-deployment-artifacts"
  AWS_REGION: "us-west-2"
  EB_VERSION: "Version-${{ github.sha }}"
  EB_DESCRIPTION: "CommitSHA-${{ github.sha }}"
  DEPLOY_ARTIFACT: "battlesnake-${{ github.sha }}.zip"
on:
  push:
    branches: [ master ]

jobs:

  test:
    runs-on: ubuntu-latest
    steps:
      - name: Git clone repo
        uses: actions/checkout@v2

      - name: Install node
        uses: actions/setup-node@v1
        with:
          node-version: '12.x'

      - name: Install dependencies
        run: npm ci

      - name: Run tests
        run: npm run test
        env:
          CI: true
Great, that is our first job complete! If you are just looking to automate your tests this is all you really need. But we also want to build and deploy our app, so lets write the build job next.
Build job
I'll get to the point a little quicker this time and then describe what you are seeing.
build:
  runs-on: ubuntu-latest
  needs: [test]
  steps:
    - name: Git clone repo
      uses: actions/checkout@v2

    - name: Install node
      uses: actions/setup-node@v1
      with:
        node-version: '12.x'

    - name: Install dependencies
      run: npm ci

    - name: Build project
      run: npm run build

    - name: Create zip deployment artifact
      run: zip -r ${{ env.DEPLOY_ARTIFACT }} build package.json package-lock.json

    - name: Configure AWS credentials
      uses: aws-actions/configure-aws-credentials@v1
      with:
        aws-access-key-id: ${{ secrets.AWS_ACCESS_KEY }}
        aws-secret-access-key: ${{ secrets.AWS_SECRET_KEY }}
        aws-region: ${{ env.AWS_REGION }}

    - name: Push deploy artifact to S3
      run: aws s3 cp ${{ env.DEPLOY_ARTIFACT }} s3://${{ env.EB_DEPLOY_ARTIFACT_S3_BUCKET }}/
At the top of this job we use the needs parameter on the previous test job. This is what allows us to run our jobs in sequence each relying on the previous job ending successfully.
Next you can see that the first three steps are identical to the previous job. We checkout our code, install Node, and install our dependencies.
Then we run our build script defined in our package.json. Since I am using TypeScript I am using the TypeScript compiler to build my code, so my build script is "build": "tsc -p .".
Next we use the zip command included with Ubuntu to package our code into a deployment artifact. -r in means we want to recurse into directories, ${{ env.DEPLOY_ARTIFACT }} is the name of the file we are creating that we defined earlier as an environment variable, and lastly we pass the files we want to include. For my deployment I include everything in my build/ directory as well as my package.json and package-lock.json. You need to include whatever files you want for your deployment.
For my deployment I want to store my deploy artifact in AWS S3. In order to push this file to S3 we first need to configure our credentials that we setup earlier with our IAM User and Github Secrets.
This next step uses an action provided by AWS. We pass it our aws-access-key-id and aws-secret-access-key that we stored in our repo's secrets earlier. These are accessed by ${{ secrets.NAME_OF_SECRET }} where NAME_OF_SECRET is what you named it when you created it. We also need to pass the aws-region that we set earlier in our environment variables.
Lastly, now that our AWS credentials are set up, we can push our deployment artifact up to S3. I believe as part of setting up the AWS credentials that action also installs the AWS CLI for us. So we want to copy our file to S3 using aws s3 cp and by passing the name of the file as ${{ env.DEPLOY_ARTIFACT }} and the location we want to push to as s3://${{ env.EB_DEPLOY_ARTIFACT_S3_BUCKET }}/. Both the artifact name and bucket name we set earlier as environment variables.
Deploy job
Now we have our deployment artifact built and saved to S3. We can write our last job to deploy this package to AWS Elastic Beanstalk.
deploy:
  runs-on: ubuntu-latest
  needs: [build]
  steps:
    - name: Configure AWS credentials
      uses: aws-actions/configure-aws-credentials@v1
      with:
        aws-access-key-id: ${{ secrets.AWS_ACCESS_KEY }}
        aws-secret-access-key: ${{ secrets.AWS_SECRET_KEY }}
        aws-region: ${{ env.AWS_REGION }}

    - name: Create new ElasticBeanstalk Application version
      run: |
        aws elasticbeanstalk create-application-version \
        --application-name ${{ env.EB_APPLICATION }} \
        --source-bundle S3Bucket="${{ env.EB_DEPLOY_ARTIFACT_S3_BUCKET }}",S3Key="${{ env.DEPLOY_ARTIFACT }}" \
        --version-label ${{ env.EB_VERSION }} \
        --description ${{ env.EB_DESCRIPTION }}

    - name: Deploy artifact to ElasticBeanstalk
      run: |
        aws elasticbeanstalk update-environment \
        --environment-name ${{ env.EB_ENVIRONMENT }} \
        --version-label ${{ env.EB_VERSION }}
You can see at the beginning of this job that it depends on the build job. That way it will only start once the build has completed successfully.
The first step is just copied from the previous job. We are going to use the AWS CLI to deploy our app so we need to set up our credentials again.
The second step uses the AWS CLI to create a fresh Application version for this deployment. You can see it uses aws elasticbeanstalk create-application-version with a few flags. We pass in the application-name, version-label, and description we set earlier as environment variables. We also pass in the source-bundle which is the location in S3 that we stored our deployment artifact. Both the name of the bucket and the name of the file (the key) we saved in environment variables as well.
The last step is to update the environment version in Elastic Beanstalk. We use aws elasticbeanstalk update-environment and pass it the environment-name and version-label that we saved earlier as environment variables.
And thats it! The workflow file all together should look something like this:
name: CICD_Pipeline
env:
  EB_APPLICATION: "Battlesnake"
  EB_ENVIRONMENT: "Battlesnake-env"
  EB_DEPLOY_ARTIFACT_S3_BUCKET: "battlesnake-deployment-artifacts"
  AWS_REGION: "us-west-2"
  EB_VERSION: "Version-${{ github.sha }}"
  EB_DESCRIPTION: "CommitSHA-${{ github.sha }}"
  DEPLOY_ARTIFACT: "battlesnake-${{ github.sha }}.zip"
on:
  push:
    branches: [ master ]

jobs:

  test:
    runs-on: ubuntu-latest
    steps:
      - name: Git clone repo
        uses: actions/checkout@v2

      - name: Install node
        uses: actions/setup-node@v1
        with:
          node-version: '12.x'

      - name: Install dependencies
        run: npm ci

      - name: Run tests
        run: npm run test
        env:
          CI: true

  build:
    runs-on: ubuntu-latest
    needs: [test]
    steps:
      - name: Git clone repo
        uses: actions/checkout@v2

      - name: Install node
        uses: actions/setup-node@v1
        with:
          node-version: '12.x'

      - name: Install dependencies
        run: npm ci

      - name: Build project
        run: npm run build

      - name: Create zip deployment artifact
        run: zip -r ${{ env.DEPLOY_ARTIFACT }} build package.json package-lock.json

      - name: Configure AWS credentials
        uses: aws-actions/configure-aws-credentials@v1
        with:
          aws-access-key-id: ${{ secrets.AWS_ACCESS_KEY }}
          aws-secret-access-key: ${{ secrets.AWS_SECRET_KEY }}
          aws-region: ${{ env.AWS_REGION }}

      - name: Push deploy artifact to S3
        run: aws s3 cp ${{ env.DEPLOY_ARTIFACT }} s3://${{ env.EB_DEPLOY_ARTIFACT_S3_BUCKET }}/

  deploy:
    runs-on: ubuntu-latest
    needs: [build]
    steps:
      - name: Configure AWS credentials
        uses: aws-actions/configure-aws-credentials@v1
        with:
          aws-access-key-id: ${{ secrets.AWS_ACCESS_KEY }}
          aws-secret-access-key: ${{ secrets.AWS_SECRET_KEY }}
          aws-region: ${{ env.AWS_REGION }}

      - name: Create new ElasticBeanstalk Application version
        run: |
          aws elasticbeanstalk create-application-version \
          --application-name ${{ env.EB_APPLICATION }} \
          --source-bundle S3Bucket="${{ env.EB_DEPLOY_ARTIFACT_S3_BUCKET }}",S3Key="${{ env.DEPLOY_ARTIFACT }}" \
          --version-label ${{ env.EB_VERSION }} \
          --description ${{ env.EB_DESCRIPTION }}

      - name: Deploy artifact to ElasticBeanstalk
        run: |
          aws elasticbeanstalk update-environment \
          --environment-name ${{ env.EB_ENVIRONMENT }} \
          --version-label ${{ env.EB_VERSION }}
Testing the workflow
Let's give it a try and see it in action. If you push this file to your master branch it should trigger the workflow.
In these screenshots I pushed a change where I removed some logging that I had previously in my workflow since it is triggered based on pushes to master. If for some reason it doesn't trigger when you push the workflow try pushing something else to master after the workflow already exists in master.
You can then navigate to the Actions tab of your repo to see the workflow running.
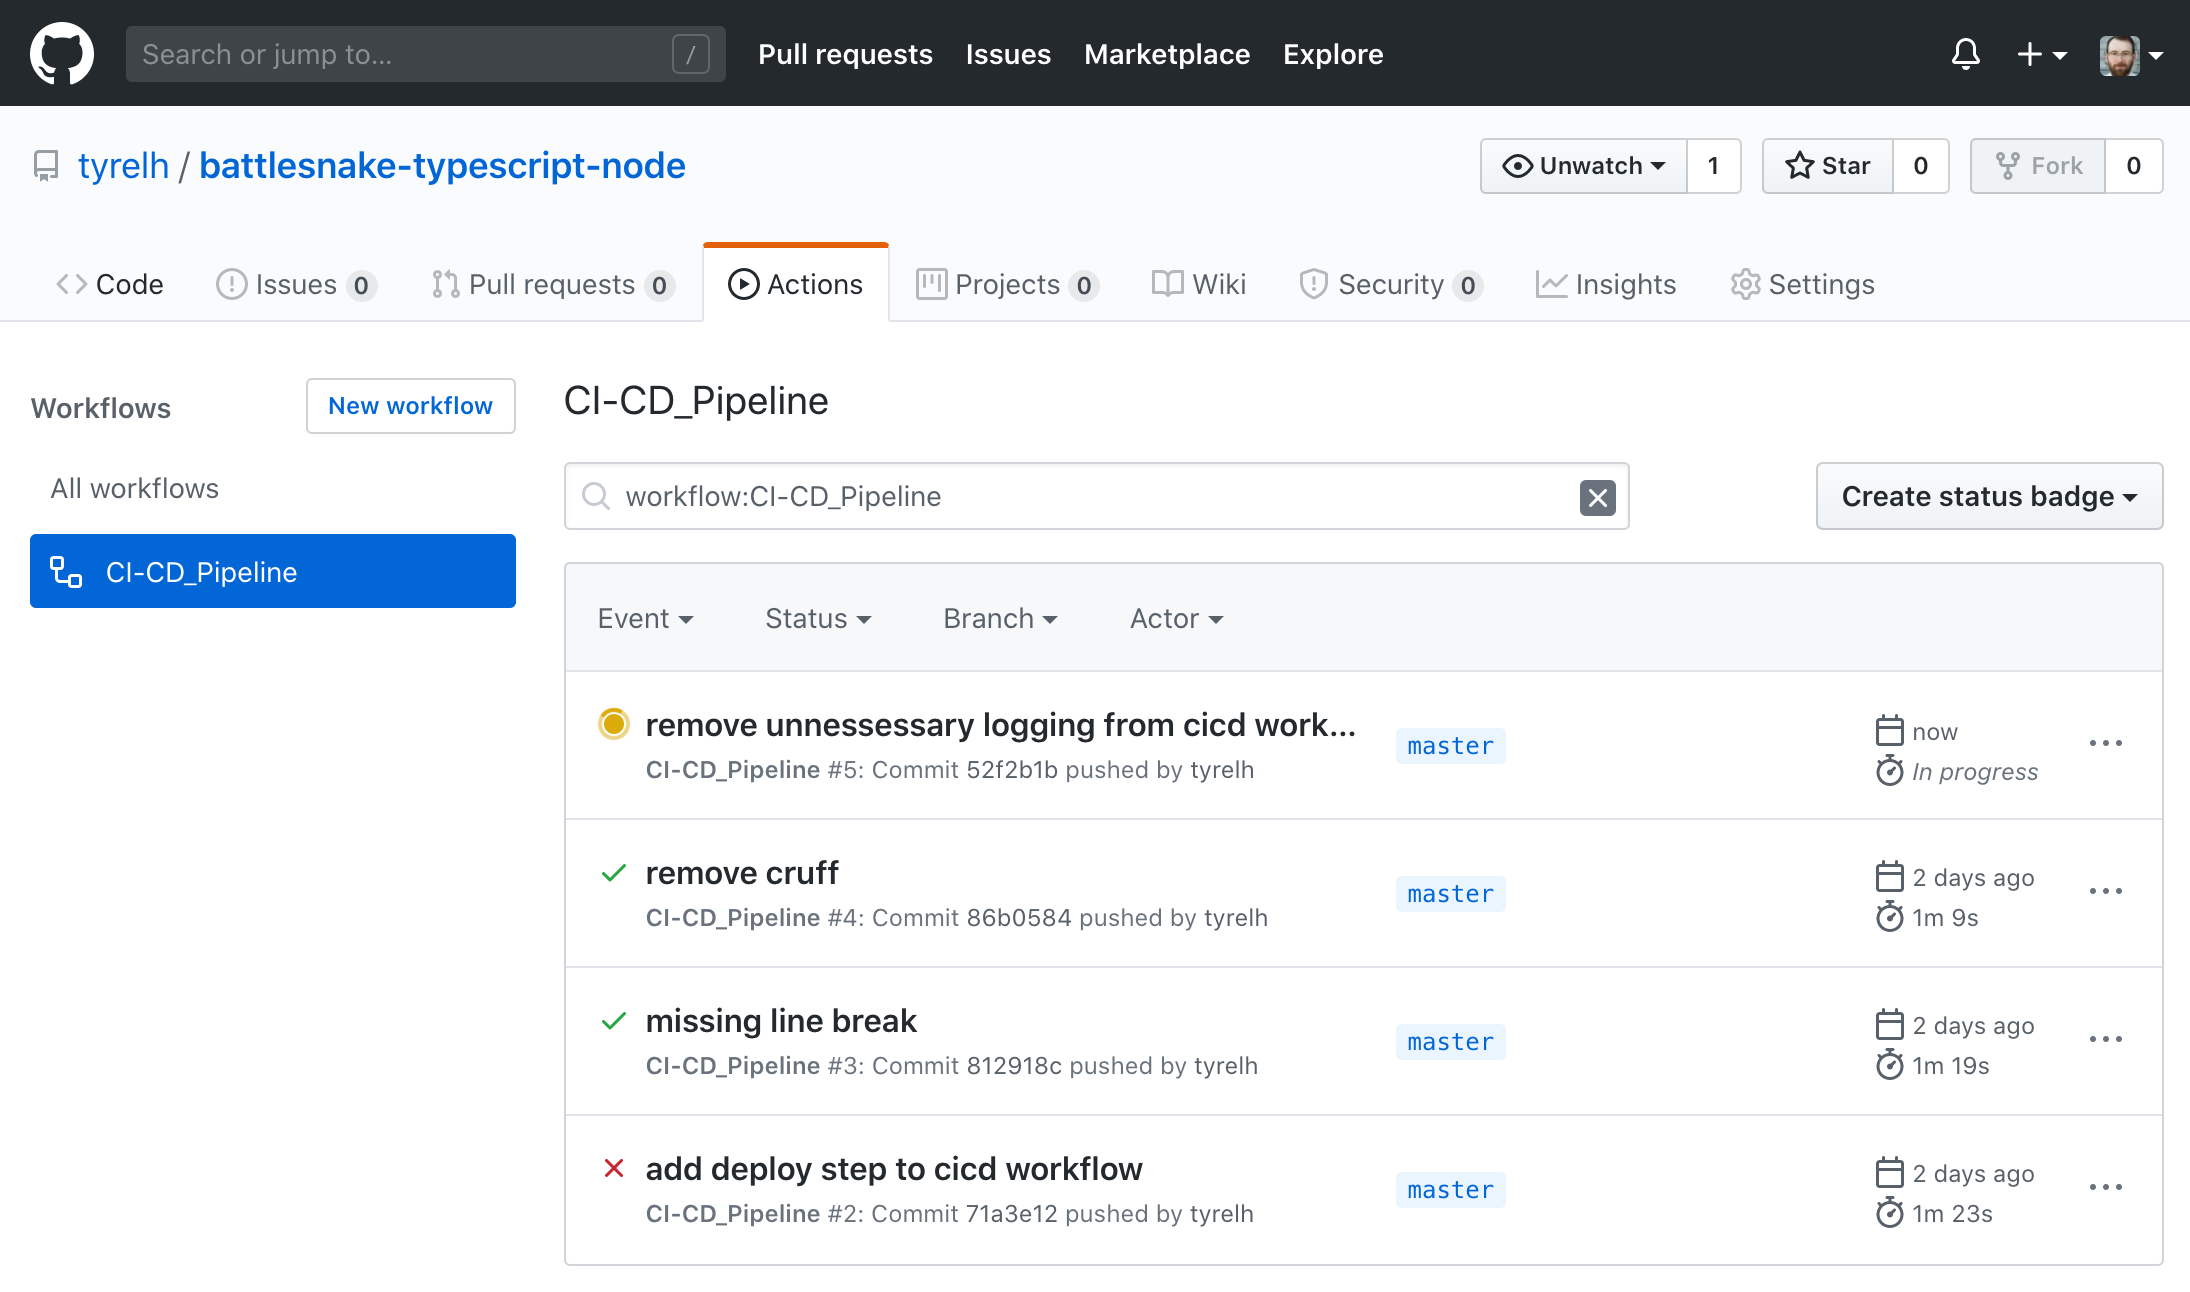
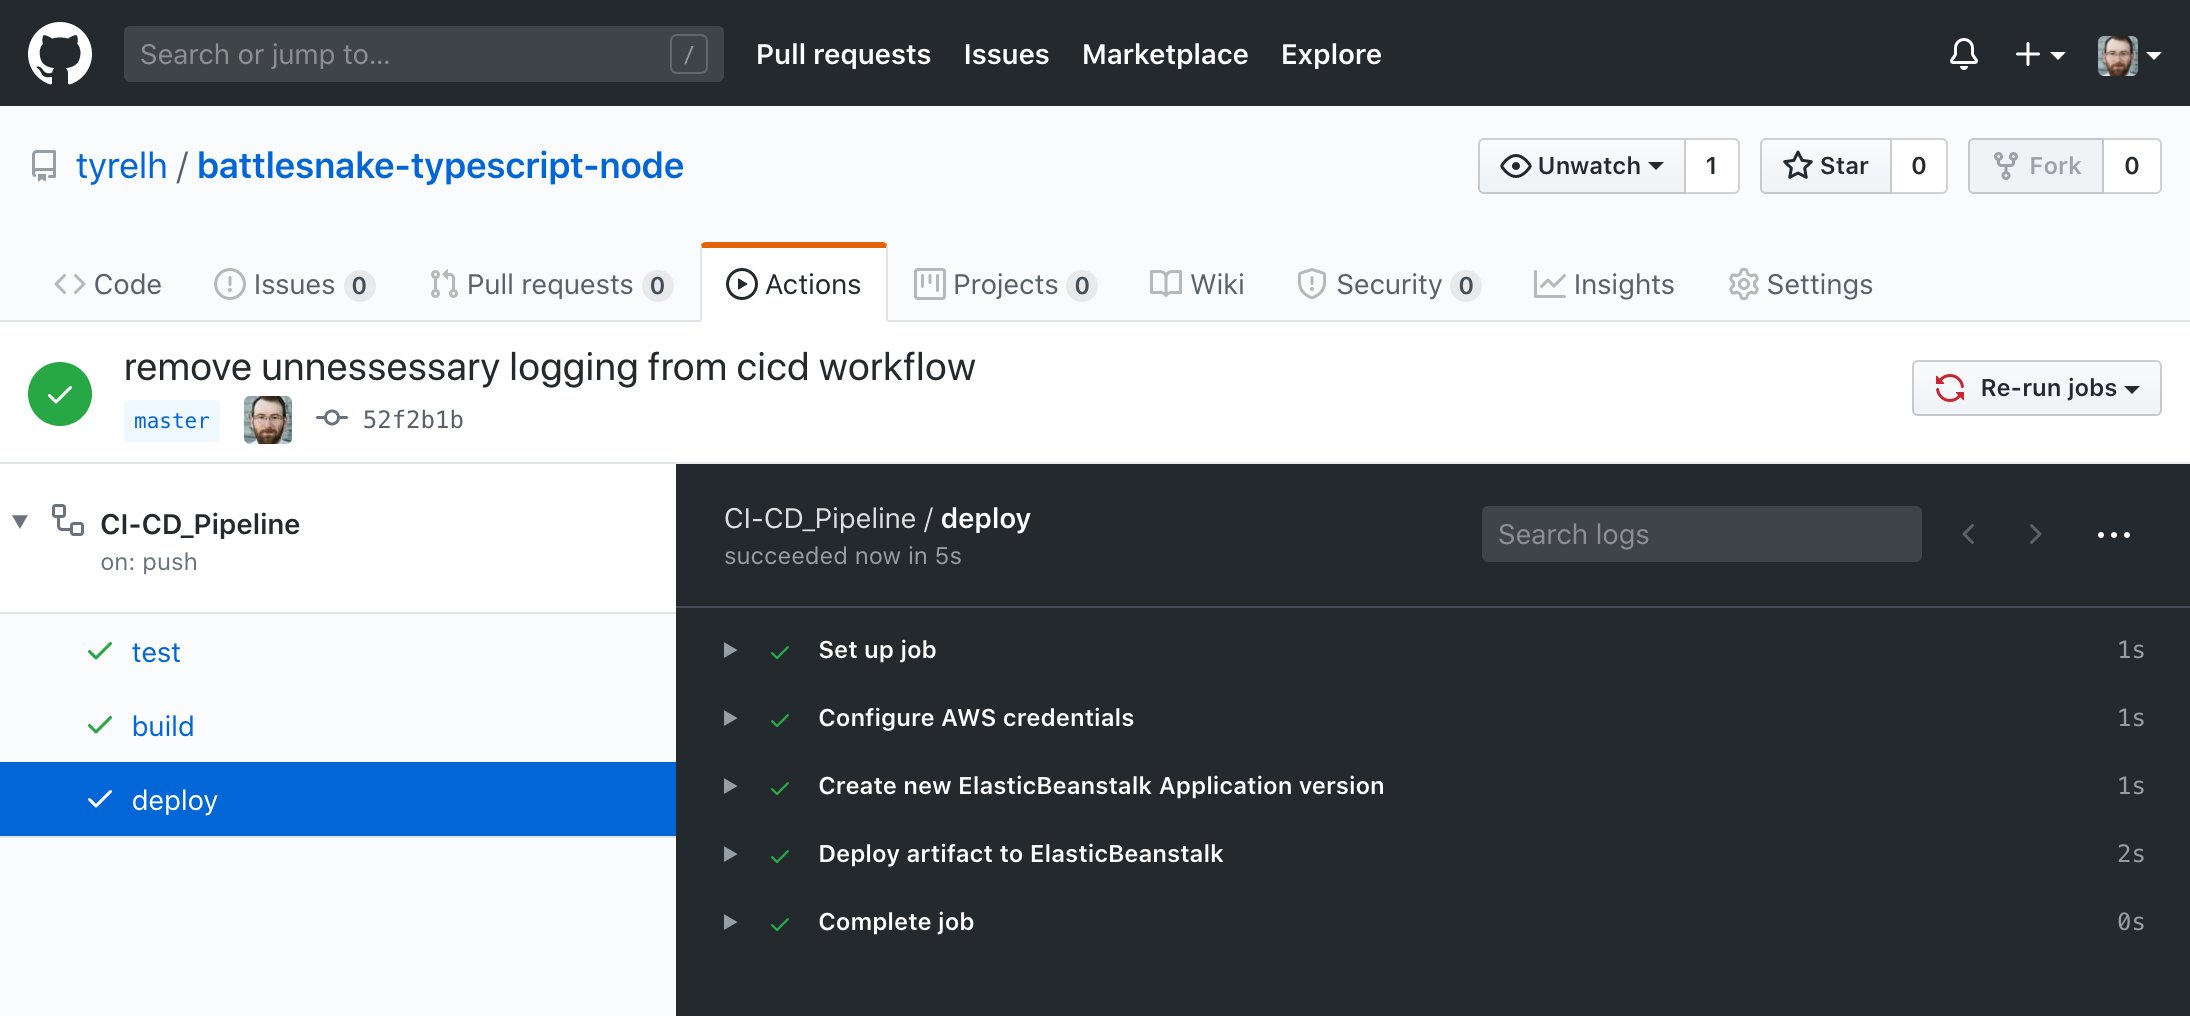
You can click into the running workflow and see the console output of each job and step. If there are any errors along the way you should see some red failure symbols and console output describing what when wrong. If nothing goes wrong you should see green success messages.
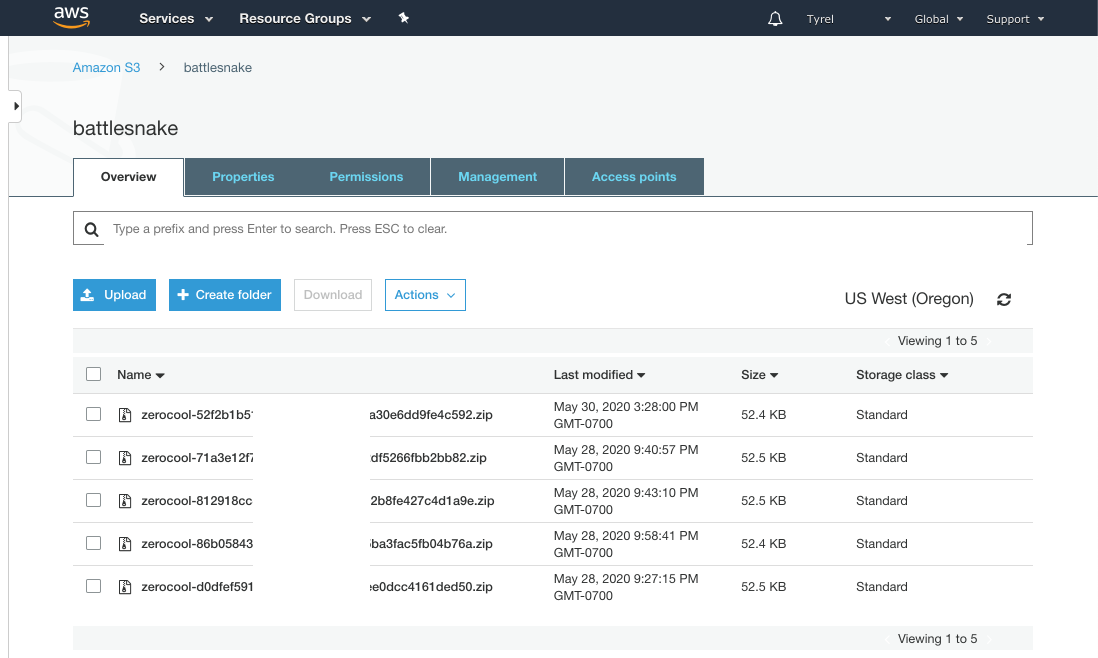
If you pop over to your AWS Console you can peek into S3 and see the deployment artifact just uploaded to your bucket.
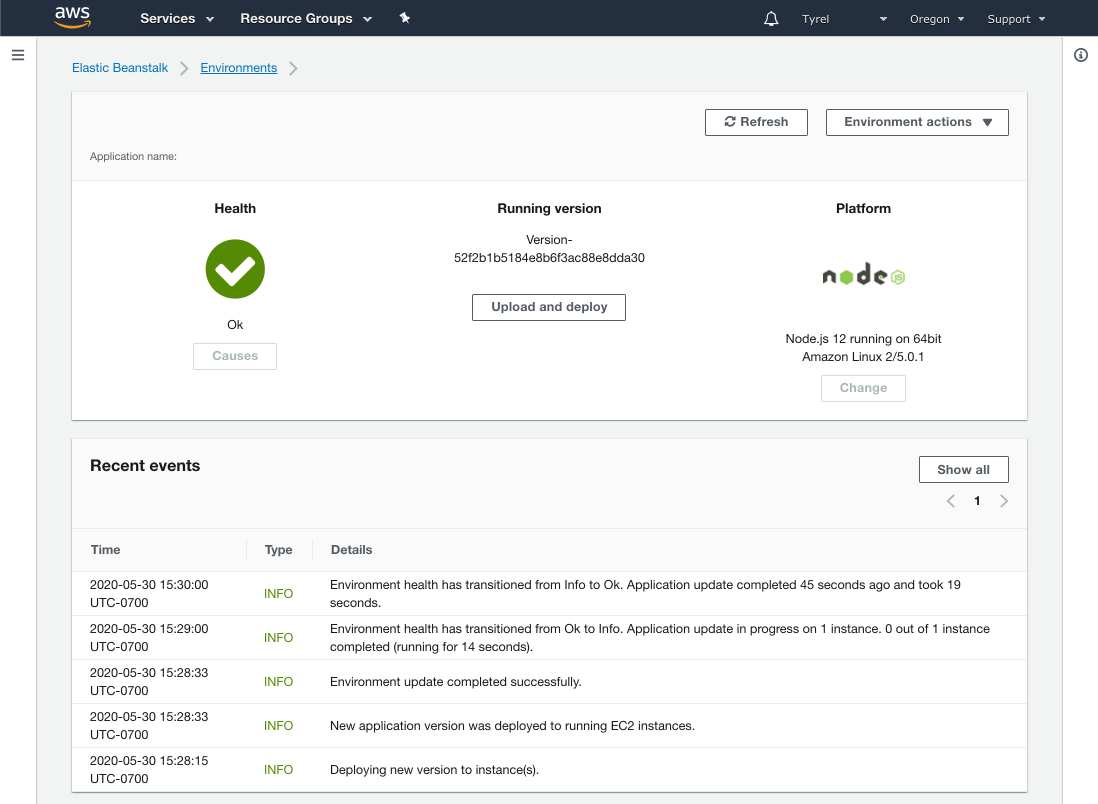
And if you navigate to Elastic Beanstalk you should see your application running or perhaps in start-up.
So there you go! If that all went well now you have a completely automated CI/CD pipeline. Every time you push to your master branch your repo will be tested, built, and deployed automatically. You can change the triggers if you like depending on your workflow to instead trigger on pull request or whatever else.
This workflow is specific for a Node app being deployed to AWS Elastic Beanstalk but it can be adapted to basically any software stack and cloud provider. Github has many Actions you can leverage for all kinds of things, and a lot of third parties are creating their own actions for their software as well.
Automate all the things!